
 Permachar
The Navigator 'Backup' TLUD stove designs on this page are covered by the following Creative Commons License found here: https://creativecommons.org/licenses/by-nc-sa/4.0/
Feel free to do what you want with the Navigator 'Light' V2. I worked out that in order to make the 'Light' commercial for tube cutting, I ended up with the Navigator 'Backup' V4. There could be some cottage industry potential for the artisanal approach using grinding to keep the form factor small and lightweight, possibly for trekking. Good luck and enjoy the R&D!
Navigator 'Backup' V1 TLUD Stove

I've seen, sold, used, designed and built many different stoves over the years. The Navigator 'Backup' TLUD stove in my mind is one of the best I've ever used. If the design works well and is popular, there's a possibility to commercialise V4 with 3D laser tube cutting. The size of the global TLUD stove marketplace is staggering. If there are 1.2 billion people still using biomass as their main cooking and water pasteurization/boiling fuel, and people in industrialised Countries want a TLUD as their primary or backup option, you get the gist. Electrification, although moving quickly in many Countries, will still be subject to methane marketing and legislation, and probably not realistic for a number of reasons that will vary in many places. And besides, TLUD stoves are 'Carbon negative', producing biochar as the byproduct of cogeneration from the biomass fuel for permanent 'Carbon removal' with many applications.
Here are some pros
- 'Multi purpose' tech
-
- pasteurization/WASH
- cooking
- biochar cogeneration/by-product
- No patents or patents pending. This 'Navigator Stove' design is an adaptation for a grinder and steel tube based on the Top-Lit UpDraft (TLUD) mainframe design principles which are completely 'Open source' to use
- Cost-effective
- 'Green' 'Carbon negative' (produces biochar) multi-biomass fuel stove suitable for biomass pellets eg.wood and environmental biomass fuel
- Clean emissions (Needs emission testing at 'Aprovecho Research Center' to confirm) and smokeless fire (Biomass fuels with 15% or lower moisture content are easier to burn)
- Made from durable, high quality 304 stainless steel
- Weld-free/no weld fabrication. Easy tube grinding with 2D laser cut pot stand (cross piece) with optional grinded pot stand
- Depending on fuel restrictions eg.National Parks, which should be followed, possibly no more ethanol, butane, propane, white fuels eg.Shellite, petrol, diesel, kerosene etc.
- No pressurised and single use gas canisters or pressurised fuels for mutli-fuel stoves
- If used for an outdoor kitchen it's an alternative to LPG and natural gas/'unnatural methane' (which produces harmful benzene emissions during combustion)
- A great option if no electricity is available as the stove is unpowered with no electronics to potentially fail
- If there is electricity available but not 'Green' eg. a fossil-powered grid, or reliable eg. brown outs or black outs, the stove is an alternative to electric stove tops. Could be used as a backup stove just in case or if you just like 'Carbon negative' outdoor cooking at home or away!
- Easy to operate
- Solid state operation (no moving parts)
- Modular: Tube, cross piece (2)), optional 6" heat and wind shield. Billy lifters/pliers/C clamp are essential. For an outdoor kitchen I recommend using the oven tray/saucepan quench system.
- Suitable for a range of cooking accessories eg. 3L billy, frypan, saucepan, Kadhai wok (+inverted wok ring) etc.
- No maintenance
- Can be 'quenched' with water or soil. No need to carry fuel across borders - just a trowel (handy for bush bogs too)
Here are some cons
- No air->Oxygen->flame->heat control during a burn. If this is an issue and you can afford and access one, then the 'FabStove' could be a good option (too large and heavy for trekking though could be suitable for a car or permanent base camp/guest house, which could also use the 5" 'Navigator V1' for, eg. yak dung, cow dung etc. integrated into an existing stove top)
- Probably not suitable (or allowed in more regulated Countries) for indoor use
- Probably too heavy for 'Alpining' (plus there's the fuel access and the stove and fuel weight problem at higher altitudes - Gravity's a bitch for weight)
- Potentially no access to and/or finance for tools, materials and electricity for manufacturing
Additional Technical Specifications
- 3L billy with a 28-37m 2.8L water boiling time (time after lighting the fire) using wood pellets
- 1h-1h11m burn time using wood pellets
- Maximum fuel volume and dims similar to the Permastove V4 which has been extensively and successfully tested
- Stove weight 944g
- Stove volume 1.62 litres
- 98% biochar recovery ('Carbon negative') using wood pellets
- Maximum fuel cost per burn: 15kg (bag of wood pellets)/0.64 (max wood pellet weight)=23.4 burns so at $19.95 per bag, $1.17 per burn
Design
- 5 x 20mm tube sections off 1m for 5 stoves
- 2 rows of primary air slots at base
- 1 row of secondary air slots 140mm above base (enough volume below for a range of feedstocks and burn times)
- 4 equidistant notches eg. 7mm x 5mm on top (for stable pot stand/cross piece placement)
-pot stand (cross piece recommended)
*if a lighter stove with less volume is needed, the fuel volume can be reduced (with shorter burn time). Later in the page is my attempt doing this which I've called the Navigator Stove 'Light'
Materials
- 1m length of 4" 304 1.6mm stainless exhaust tube
I should mention here that the 1m lengths of exhaust should be considered for prototyping, small production runs and not mass production. Also, the high quality grade of 304 exhaust tube is probably overreach for wood pellets but not for some environmental fuels.
- Pot stand: 2D laser cut 304 2.5mm cross piece (see dxf for CAD software eg.LibreCAD, below) or optional grinded pot stand off sheet metal eg.304 2.5mm

Tools
- small 100mm (corded) grinder (slots) eg.Makita
- large 230mm (corded) grinder (tube sections) eg. Metabo
-Kango 2nd cut flat steel file
I'm using 2.5mm thick discs (eg. Makita) in both
-2D laser cutter (pot stand)
Personal Protective Equipment (PPE)
- goggles
- welding helmet in 'Grind' mode
- leather gloves
- cotton clothing
Build
* applicable to the Navigator 'Backup' V1 or V2 and possibly future versions
- wear the PPE
- secure the tube to a woodcraft vice mounted (side/bottom) on a wooden table or workbench
- measure out the primary slot rows (2), secondary slot rows (1 or 2) and tube top with a texter and ruler
- grind the primary and secondary slots with the 100mm grinder
- cut off the tube section with the 230mm grinder
- measure out the top notch placement with cross piece and texter then file, using the edge of the file at a 30 degree angle, for 4 top notches ~7mm wide and 5mm deep (for a pot stand/cross piece)
- clean up the steel with the file, inside and outside, top and bottom
-pot stand: 2D laser cut cross piece OR grinded off sheet
Operation
-position the stove in the centre of a thick bottomed stainless saucepan/8" cast iron skillet, on a flat surface
-fill the stove with fuel eg.wood pellets, rice husk pellets, bamboo, sticks etc. up to desired level to a maximum height of 10mm below the bottom row of secondary air slots
-add a circle of firelighter gel 2cm in from the tube edge (or 3 cotton wool buds soaked in kerosene)
-position the pot stand (cross piece) guided by the 4 notches
-light the stove from the top with a wooden skewer/bamboo piece lit at one end (with a small dob of gel at the end)
-position the cooking accessory eg.3L billy, on top of the cross piece after 2 minutes
-ready to run without adding any additional fuel during the burn
At the end of the burn:
-flame goes out and usually smoke follows
-put on some leather gardening gloves (and keep them on until the water quench or soil quench has been performed)
-remove the cooking accessory
1-Water quench (if enough water is available). Add water from above the top of the stove eg.water jug, for initial quench of biochar pellets until oven tray/saucepan/pot water level is above the primary air slots (mind the steam)
-remove the pot stand (cross piece) with billy lifters/pliers/C clamp
-lift the stove vertically eg. 20cm above the oven tray/saucepan, with billy lifters/pliers/C clamp, and the biochar will fall out the bottom (may need to use a stick to push out the biochar)
-using a stick, stir the biochar into the water and there will then be a complete quench
-wait 10 minutes then, wearing leather gloves, empty the oven tray/saucepan/pot into a bucket eg. a 20L stainless one, then it will be ready for the next burn
OR
2-Soil 'quench'. Next to the stove, dig some soil and make a pile before the burn.
-remove the pot stand (cross piece) with billy lifters/pliers/C clamp
-fill up the air space between the heat and wind shield and stove plus the air space inside the stove, above the biochar, with soil
-Leave for 10 minutes
-lift the stove vertically with billy lifters/pliers/C clamp until all the biochar and soil has fallen out the bottom (may need to use a stick to push out the biochar and soil)
-mix the biochar in with the soil inside the shield space
-remove the shield with billy lifters/pliers/C clamp
-add the biochar and soil mix back into the soil hole, next to the stove - the climate and microbes will love it!)
END
TESTING


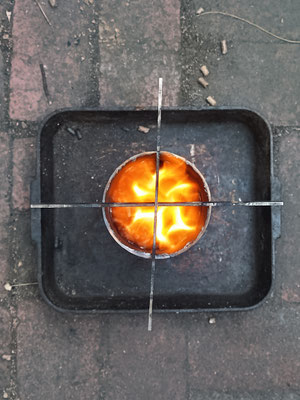


OK, guys. I don't think I can improve the 'Navigator Stove' at this point. With a burn time of around 1 hour for wood pellets and 98% biochar recovery, I think this design strikes a good balance between DIY manufacturing, available steel, available and affordable fuel, stove weight, stove volume and a near or complete flame cap (ideal for fuel efficiency in an Oxygen limited environment for high quality biochar).
The 4th burn
- slight cross breeze
- wood pellets
-3L billy
- 5m startup
- 2.8L water boiling time: at 33m
- burn time:1h4m
- Biochar recovery: 98%
The 5th burn
-no wind, 9 degrees Celsius ambient temperature
- wood pellets
-3L billy
- 5m startup
- 2.8L water boiling time: at 37m
- burn time:1h11m
- Biochar recovery: 98%
The 9th burn
- heat and wind shield
- Tatonka 2.5L cookware
- wood pellets
- ambient temperature: 13 degrees Celsius
- 5m startup
- 2L water boiling time: 44m
- the lid controls boiling and simmering
- burn time:1h22m
- Biochar recovery: 95%
The 10th burn

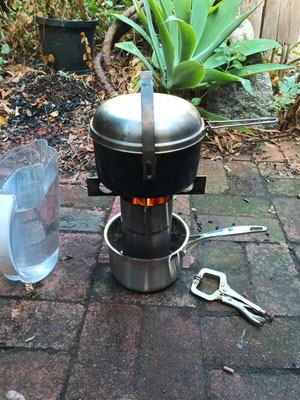


- Tatonka 2.5L cookware
- Scanpan 16cm saucepan (6.4mm thick base) for quench system
- wood pellets, 2cm below secondary air slots
- ambient temperature: 13 degrees Celsius, RH 73% ('Wunderground' app), no breeze
- 5m startup
- 2L water boiling time: 28m
- the lid controls boiling and simmering
- burn time:1h3m
- Biochar recovery: 98%

Navigator 'Backup' V2 TLUD stove
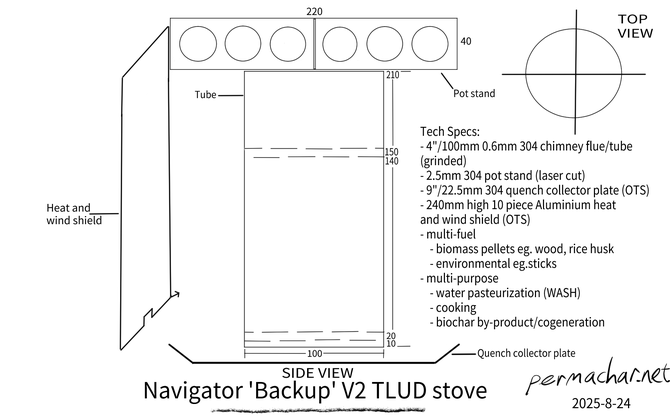
I hope to prototype this beauty in the next couple of months.
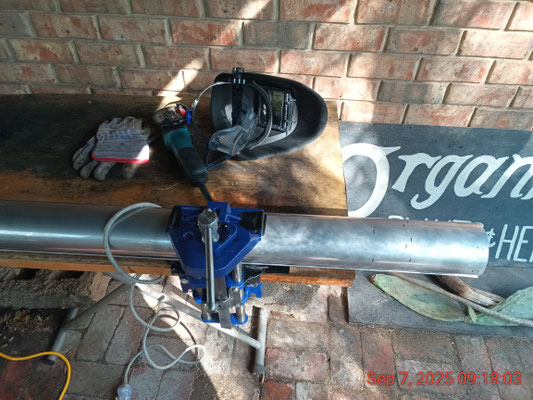
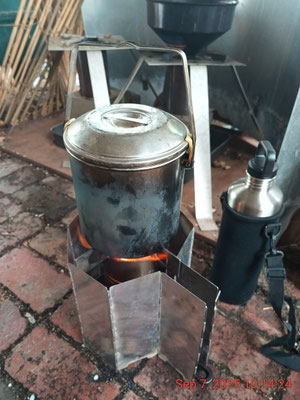
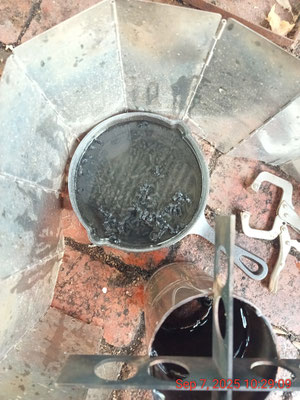
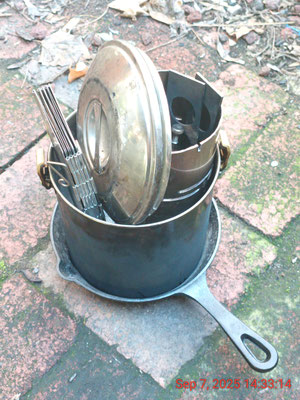
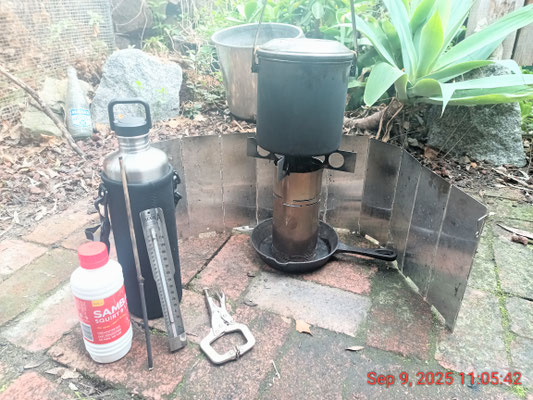
I'm going to use two different Zebra billys for testing, integrating the cooking and WASH system with the Navigator 'Backup' V2.
A Zebra 2L billy is useful for:
- mobile scenario eg.trekking
- soil quenching - no bottom quench reservoir needed
- environmental fuel
- collect water in billy
- 1.9L pasteurized water->2L SS bottle
A Zebra 3L billy is useful for:
- semi-mobile scenario eg. Base camp, car camping, caravan;
- collect water in billy/20L 'Dirty' water container (eg. a HDPE 20L container, upcycled with no original toxic liquids present and apparently BPA free)
- 2.9L pasteurized water
- ?g wood pellets needed and time taken to pasteurization (see testing notes below)
- 2L water->2L SS bottle
- 250mL coffee/tea->SS cup (Pathfinder cup/other cup)
- food, cooked after pasteurization (SS bowl included with billy)
- 650mL body and dish washing (Pathfinder/other BPA free 1L water bottle)
- a wetted microfiber towel for the body
- scourer/sponge with siphoned water, in billy, bowl and cup
- a 5L billy (untested) could be used on a 'Backup' V2 though less stable than a 3L billy
In both mobile and and semi-mobile scenarios:
- a 'Lifestraw' could be used directly in the drinking water if additional water filtration is needed (also in emergencies directly in dirty water if no pellets/environmental fuel is available
for stove pasteurization)
In a stationary setting eg. shack, Tiny house, house etc.:
- could use a Navigator 'Backup' V2 and 3L billy OR
- could use a Navigator 'Awesome' V2 and 15L stockpot (1kg wood pellets, in 50m, for 14L of pasteurized water), or even a 20L stockpot (untested), with optional water filtration in a 'Permafilter
20L' (built with biochar pellets and milled biochar pellets from the 'Awesome' BUT needs 'Clean' water quenching, possibly from the Permafilter 20L) then siphoned into a 20L
'Clean' water container (with bottom tap for convenience)
TESTING
-first prototype with fucked air slots
Max fuel capacity test run for 663g of wood pellets (up to bottom row of secondary air slots)
- ambient temperature 20 degsC
- slight gusty cross breeze
- burn time:1h18m
- Biochar recovery: 98%
-second prototype with perfect alternating air slots
Max fuel capacity test run for 600g of wood pellets (1cm below bottom row of secondary air slots)
- ambient temperature 14degsC
- slight cross breeze
- burn time: 1h17m
- Biochar recovery: 85% (curious - needs more test runs)
500g wood pellets
-Second prototype
No water pasteurization
1st burn
- ambient temperature degsC
- slight cross breeze
- burn time: m
- Biochar recovery: %
400g wood pellets
-Second prototype
1st burn
- ambient temperature 20 degsC
- slight cross breeze
- burn time: 32m
- Biochar recovery: 85%
300g wood pellets
-first prototype
Water pasteurization, with 3L billy
1st burn
- ambient temperature: 16 degsC
- slight cross breeze
- startup time: 2m
- Zebra billy 3L (2.9L)
- t=0, 14 degsC
- t=10, 57 degsC
- t=15, 78 degsC
- t=20, 95 degsC
- t=22, 100 degsC/boiling
- t=27, end of burn
- pasteurization OK at 15m!
- Final water temperature: 100degsC
- burn time: 27m
- Biochar recovery: 100%
-Second prototype
No water pasteurization, no billy (which increases updraft)
1st burn
- ambient temperature 18 degsC
- slight cross breeze
- burn time: 28m (with hot coals at the bottom)
- Biochar recovery: 100%
Water pasteurization, with 5L billy
1st burn
- ambient temperature: 12 degsC
- slight cross breeze
- startup time: 2m
- Zebra billy 5L (4.8L)
- t=0, 13 degsC
- t=10, 42degsC
- t=15, 55degsC
- t=20, 66degsC
- t=25, 74degsC
- t=30, 78degsC
- pasteurization OK at 25m!
- Final water temperature: 78degsC
- burn time: 30m
- Biochar recovery: 100%
Water pasteurization, 3L billy
1st burn
- ambient temperature: 14degsC
- no breeze
- startup time: 2m
- Zebra billy 3L (2.9L)
- t=0, 9degsC
- t=10, 48degsC
- t=15, 73degsC
- t=20, 91degsC
- t=25, boiling/100degsC
- t=30, 94degsC (hot coals)
- t=35, 92degsC
- pasteurization OK at 15m!
- Final water temperature: 92degsC
- burn time: 35m
- Biochar recovery: 100%
2nd burn
- ambient temperature: 11 degsC
- no breeze
- startup time: 2m
- Zebra billy 3L (2.9L)
- t=0, 10degsC
- t=10, 61degsC
- t=15, 83degsC
- t=20, boiling/100degsC
- t=25, boiling/100degsC
- t=30, 93degsC (hot coals)
- t=35, 90degsC
- pasteurization OK at 15m!
- Final water temperature: 99degsC
- burn time: 35m
- Biochar recovery: 100%
3rd burn
- ambient temperature: 14degsC
- slight cross breeze
- startup time: 2m
- Zebra billy 3L (2.9L)
- t=0, 13degsC
- t=10, 57degsC
- t=15, 80degsC
- t=20, boiling/100degsC
- t=25, boiling/100degsC
- t=30, 94degsC (hot coals)
- t=35, 94degsC
- pasteurization OK at 15m!
- Final water temperature: degsC
- burn time: 35m
- Biochar recovery: 100%
250g wood pellets
-first prototype
1st burn
- ambient temperature: 21 degsC
- slight gusty cross breeze
- startup time: 2m
- Zebra billy 3L (2.9L)
- t=0, 14 degsC
- t=10, 56 degsC
- t=15, 77degsC
- t=20, 87 degsC
- t=25, 88degsC
- pasteurization OK at 15m! (Reached 71 degsC)
- Final water temperature: 88degsC
- burn time: 25m
- Biochar recovery: 100%
200g wood pellets
-second prototype
1st burn
- ambient temperature: 12degsC
- no breeze
- startup time: 2m
- Zebra billy 3L (2.9L)
- t=0, 14degsC
- t=10, 55 degsC
- t=15, 72 degsC
- t=18, 75 degsC
- pasteurization OK at 15m!
- Final water temperature: 75 degsC
- burn time: 18m
- Biochar recovery: 98%
2nd burn
- ambient temperature: 12degsC
- slight breeze
- startup time: 2m
- Zebra billy 3L (2.9L)
- t=0, 14degsC
- t=10, 57degsC
- t=15, 76degsC
- t=19, 81degsC
- pasteurization OK at 15m!
- Final water temperature: 81degsC
- burn time: 19m
- Biochar recovery: 100%
3rd burn
- ambient temperature: 12degsC
- ?breeze
- startup time: 2m
- Zebra billy 3L (2.9L)
- t=0, 14degsC
- t=10, 57degsC
- t=15, 75degsC
- t=18, 77degsC
- pasteurization OK at 15m!
- Final water temperature: 77degsC
- burn time: 18m
- Biochar recovery: 100%
Comments
- If there's too much Biochar above the pyrolysis front, there is not enough UpDraft to pyrolyse the last 15%, which seemed to be a problem for 400g and 600g on the second prototype
- 200g is good for 2.9L water pasteurization in 15m (with no cooking) and 98-100% biochar recovery
- 300g seems to be the sweet spot for functionality. Pasteurization of 2.9L in 15m then cooking for 20m with 100% Biochar recovery
-3rd prototype
210mm high
10mm and 20mm primary air slots
300g wood pellets
-single 140mm row of secondary air slots
No water pasteurization, no billy (which increases updraft)
1st burn
- ambient temperature 14 degsC
- slight cross breeze
- burn time: 25m (with hot coals at the bottom)
- Biochar recovery: 100%
- too unstable, average flame cap
500g wood pellets
-at max wood pellet capacity
-1cm below bottom row of secondary air slots
-double 130mm/140mm row secondary air slots
No water pasteurization, no billy (which increases updraft)
1st burn
- ambient temperature 15 degsC
- slight cross breeze
- burn time: 45m
- Biochar recovery: 90%
- almost 100% flame cap coverage (see picture below), though flame still a little unstable (as good as it gets without forced air/fan assisted FA)
Needs more testing but looking as stable as the Navigator 'Backup' V1 but hotter with the double row of secondary air slots, 1cm taller for larger pans overhanging the heat and wind shield footprint, and 4" 0.6mm thick 304 chimney flue as opposed to 4" 1.6mm thick 304 exhaust tube (more steel, more weight, more difficult to grind) used in V1.
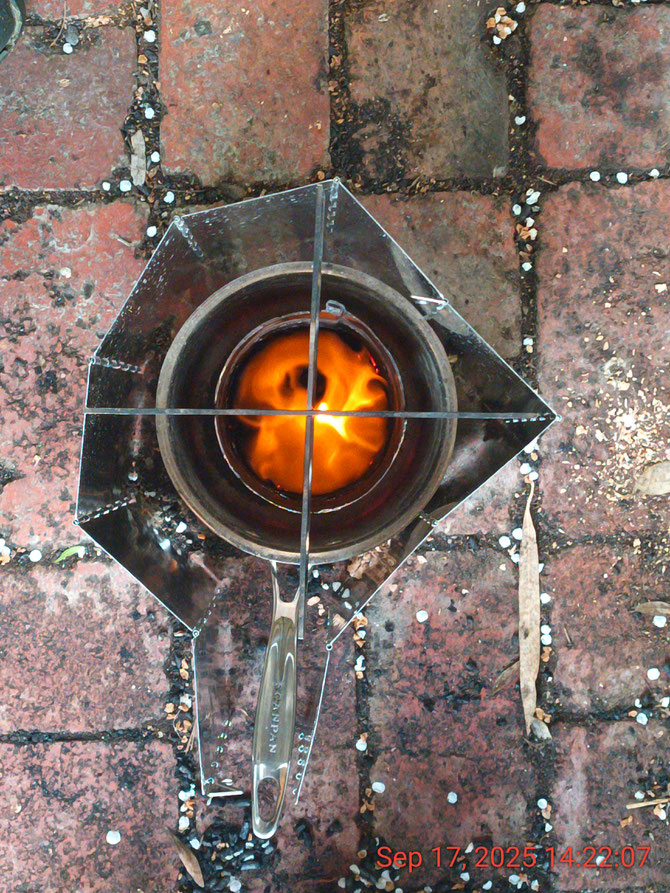
300g wood pellets continued
-latest third prototype (with 10mm/20mm primary air slots, 130mm/140mm secondary air slots, 210mm height)
Water pasteurization, 3L billy
1st burn
- ambient temperature: 14 degsC
- no breeze
- startup time: 2m
- Zebra billy 3L (2.9L)
- t=0, 12 degsC
- t=10, 61degsC
- t=15, 83degsC
- t=17, 100 degsC/boiling
- t=20, 100 degsC/boiling
- t=25, 96degsC, simmering
- t=30, 90degsC (hot coals)
- pasteurization OK at 15m!
- Final water temperature: 90degsC
- burn time: 30m
- Biochar recovery: 100%
Navigator 'Backup' V3 TLUD stove
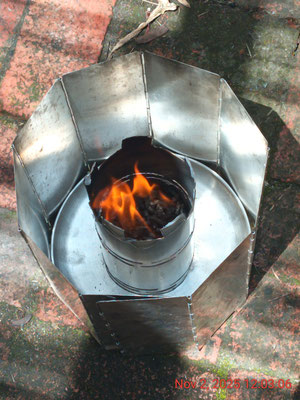
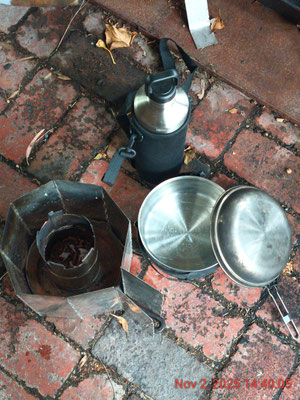
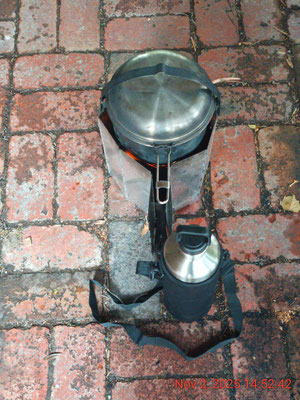
Tech specs
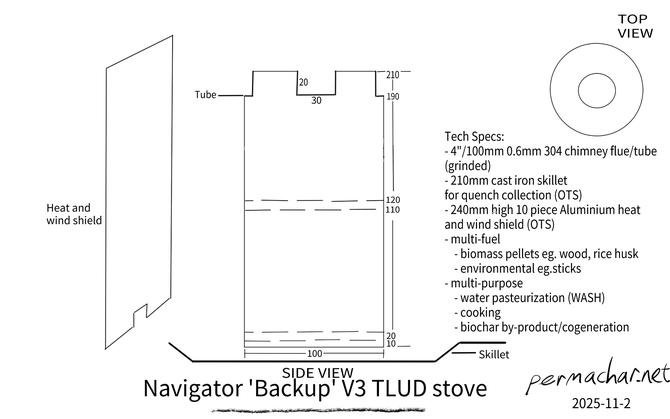
- 4" 304 chimney flue
- dims
- 210mm high
- 190-210 (20 high) turret, 30 wide between tabs (turret)
- 70 chimney (7/10 ratio for chimney length:tube diameter)
- 110/120 secondary air slots
- 10/20 primary air slots
- all grinded
- use pliers to bend out the top tabs (90 degrees) then grind them off while holding the tube vertically
- triangle pattern for alternating slots
- 50mm of tertiary air protection with 240 high heat shield
- Max wood pellet capacity: 500g (up to 100 level)
- stove weight: 284g
- perfectly matched to a 2.5L Tatonka Scout cookware
Cost
- 304 ss tube (77/5=15.4)
- 21cm cast iron skillet (19)
- Al heat and wind shield (12)
- 'Heavy duty steel' C clamp (3.60)
Total: AUD$50
TESTING
Max fuel capacity test run for 500g of wood pellets (1cm below row of secondary air slots)
- ambient temperature 22degsC
- intermittent cross breeze
- burn time: 54m
- Biochar recovery: 95%
250g wood pellets
1st burn
- ambient temperature: 18degsC
- cross breeze
- startup time: 2m
- Tatonka 2.5L + cast iron skillet
- stable
- t=0, 17degsC
- t=10, 69degsC
- t=15, 83degsC
- t=20, boiling , 100degsC
- t=25, simmering
- t=30, simmering died down
- pasteurization OK! (Reached 71 degsC)
- Final water temperature: 87degsC
- burn time: 30m
- Biochar recovery: 100%
Navigator 'Backup' V4 TLUD stove
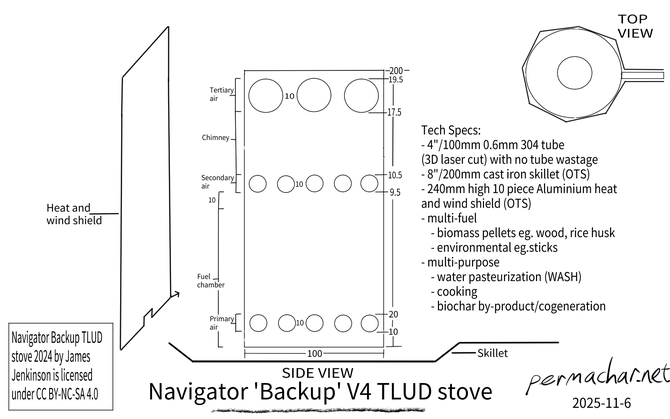
Here we go guys. The first commercial prototype of my Navigator stove series. You could call V4 a 'One piece tube TLUD', all solid state and optimised for 3D laser tube cutting. I got the
idea of a single piece TLUD from the 'Tread Lightly' TLUD stove (documented on the TLUD page) but I didn't go down that path since 3D metal printing was, at the time, and still is, not economical
for TLUDs.
This design, as with versions 1-3 are for non-commercial use only. If you want to commercialise it, I am happy to discuss it. Maybe we can collaborate? For eg., swap test data or build a business
partnership? Also, if you want to modify or share it, please acknowledge 'permachar.net' as the primary source.
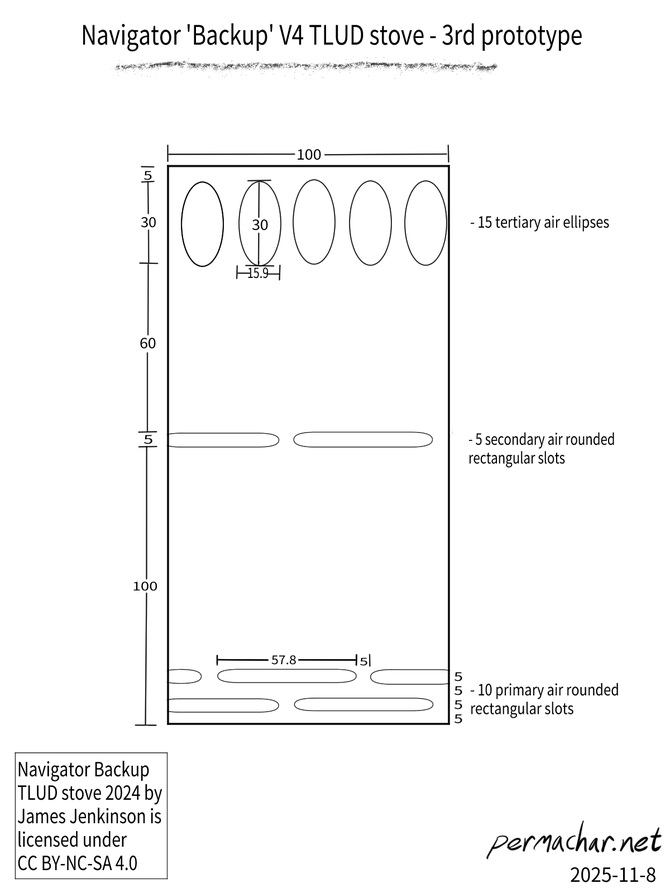
Air holes...The 10mm alternating air slots used for primary and secondary air in the first 3 'Backup' versions (with the exception of a single row of secondary air slots in V1) were
modelled on hypothetical 10mm air holes, which are now proposed for V4. The primary air holes position and chimney length (believed to be a key factor for efficiency) are similarly
configured to the Navigator 'Backup' V2 third prototype which works very efficiently. In order to accommodate tertiary air holes, I had to lower the height of the secondary air holes which in
turn has decreased the maximum fuel capacity which falls between the base and 1cm below the secondary air holes. I've also modelled the tertiary air holes on the pot stand, using 30mm air holes,
used in the Navigator 'Backup' V1 and V2 TLUD stoves, though shorter diameter at 20mm. I will know after the first physical prototype if I need to increase tertiary air holes back to 30mm and
possibly shorten the chimney back to 60mm used in V1 and V2. The idea of an integrated pot stand from the Navigator 'Backup' V3 TLUD turret formation has been adopted, which I also tried in a
prototype called the Navigator 'Turret' TLUD stove I built in 2024. My original integrated pot stand was used in the 'Tread Lightly' TLUD stove. I've also gone back to a 200mm height which
the 'Backup' V1 TLUD has in order to minimise tube wastage on a potential production line. Overall, I can't guarantee this is the most efficient configuration of air holes for primary, secondary
and tertiary air - it needs to be tested - but I'm feeling pretty confident it will work great!
I may have a problem with finding long enough 100mm 0.6mm 304 tube for the 3D laser tube cutter but I'll keep digging. Otherwise, I will have to go to 1.6mm, which will probably make the TLUD too
heavy for trekking.
Here's a YouTube link to get you started using free and open source software 'Freecad 1.0.2'
https://m.youtube.com/watch?v=MO2PCBQqi54&pp=ygUjYWxsdmlzdWFsczR1IGZyZWVjYWQgbXVsdGkgcGF0dGVybiA%3D
Another point to mention is the 8" cast iron skillet could be substituted with a thick bottom stainless frying pan/pot with the bonus that it won't rust. In a trekking situation, a soil quench could be used without a quench collector/skillet/frying pan/pot. Also, the stove could be attached with a strap to the outside of a rucksack and optional biomass fuel pellets carried in a stuff/dry sack inside the pack. I'm also aiming for a 425g maximum weight of wood pellets (approximately 45m burn time), but the weight will vary from one supplier to the next and isn't limited to wood pellets - any dry (less than 15% moisture content) biomass pellets should work. Environmental biomass fuel should work too. I'm hoping to get the tube weight lower than 300g, which in my opinion is acceptable for a trekking stove. But really, the main application is a primary or secondary/backup household stove. It would be great if the stove could be used in most scenarios (other than for large pots/pans/woks which I would recommend the DIY Navigator 'Awesome' V2 institutional TLUD stove documented on the 'Bush Survival System' page)!
In my opinion, biomass is a 'real' transition (and Ancient) 'Carbon negative' fuel/energy source and endgame if it produces biochar through cogeneration - which a TLUD does.
I should mention too that I don't want to 'Dual purpose' this design. As far as I'm concerned it's a biochar machine for sustainable adaptation to climate change and humanitarian purposes and not a war machine but opinions may differ. Maybe nothing will come of it but I've gone this far over 16 years of design, research and development that it's difficult to ignore it's potential for mass production when we have a climate emergency on hand. I have no intention of patenting my designs, which are based on open source TLUD principles that should never be patented and simply can't be patented - the genie has been out of the bottle for a long time now. Respect to the pyroneers and the future TLUD innovators.
Talking about innovation, I'm hoping also to innovate the price point per TLUD focused on the Oz market but available online for the global market. Maybe Countries with access to 3D laser tube cutters and 304 100mm tube would be interested too in the spirit of Industry 4.0? The customer would supply the heat shield, quench collector, billy lifters/C clamp and cookware. There's also a possibility for producing bioelectricity from cogen (using a flat heat exchanger on the flat top surface of the stove) with either a dedicated burn or excess burn time eg.TEGs, miniaturised Stirling engines et al, that could either directly charge a smartphone or charge a power bank.
Overall, I believe V4 is a revolutionary product and business approach for: IP (open source), manufacturing (Industry 4.0, 3D laser tube cutting eg. circle, ellipse or slot for fuel efficiency V time taken/cost with a fast & energy efficient fiber laser, to cut the tube?), fuel (circular biomass pellets from waste or environmental), modularity (accessory agnostic), Carbon footprint (the fuel is 'Carbon negative' with the biochar byproduct, which can be used for additional water filtration if needed and subsequent cascades of use), design (minimalism, single piece, no moving parts/solid state), application (primary/backup stove, humanitarian) and cost (predicted to be way cheaper than premium stove designs eg.MSR, Jetboil, Biolite et al).
TESTING MODEL
I'm going to try a new and more practical strategy for testing V4 taking it further than just water pasteurization timings and flame cap observations.
Using V4 and my Tatonka 2.5L cookware (which although expensive, is high quality stainless steel, more stable than a 3L Zebra billy, with a dual purpose lid for frying and what seems to be
a reliable supply):
- Water
- 2.5L water pasteurization (<15m, <250g)
- 2L->2L 304 water bottle
- 0.5L->tea or coffee (ss cup)
- Food (up to 30m additional burn time after water pasteurization if using 425g wood pellets at max capacity)
- what I'm looking for here is fast cooking, high nutrient/micronutrients density, protein, Vitamins, trace elements and minerals, low carbs, low salt, low fat
- For eg., water, short grain rice/quinoa with red lentil (prewashed), garlic, spices in 'one pot' (with hulled hemp seed mixed in to the stew after cooking)
Thanks for your interest!!
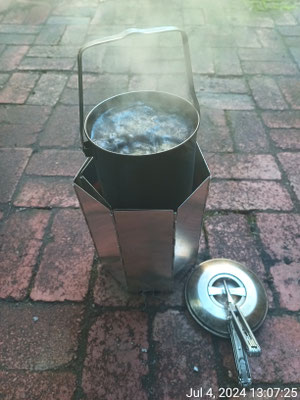
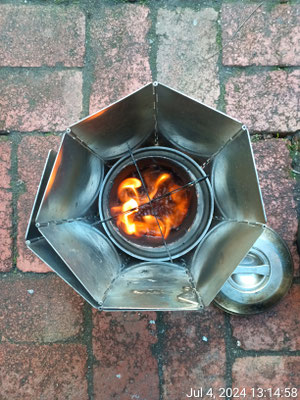
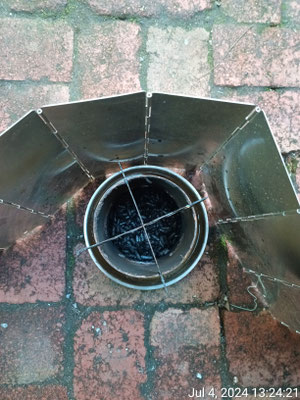
Navigator 'Light' V1 TLUD stove


Tech specs:
- Stove weight: 562g
- Stove volume: 1.22 litres
- Wood pellet fuel weight per batch: 395g
TESTING
1st burn
- 2L Zebra billy cookware (14x14)
- wood pellets, 1cm below secondary air slots
- ambient temperature: 12 degrees Celsius, RH 67%, slight breeze
- 5m startup
- 1.8L boiling time: 32m
- burn time:46m
- Biochar recovery: 100%
2nd burn
- 2L Zebra billy cookware (14x14)
- wood pellets, 1cm below secondary air slots
- ambient temperature: 7 degrees Celsius, RH 86%, slight breeze
- 5m startup
- 1.8L boiling time: 26m
- burn time: 40m
- Biochar recovery: 100%
3rd burn
- 2L Zebra billy cookware (14x14)
- wood pellets, 1cm below secondary air slots
- ambient temperature: 14 degrees Celsius, RH 44%, moderate breeze
- 5m startup
- 1.9L boiling time: 26m
- burn time: 45m
- Biochar recovery: 95%
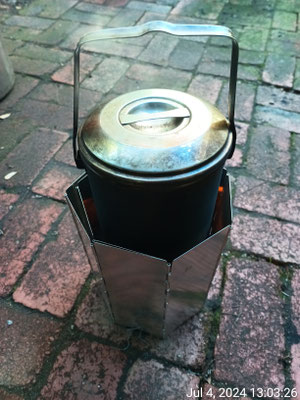
Navigator 'Light' V2 TLUD stove
Fuel
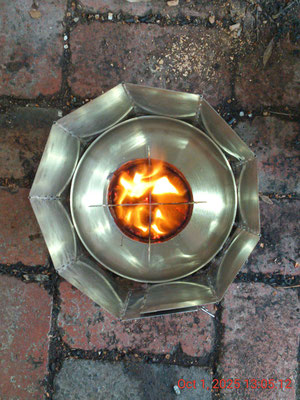
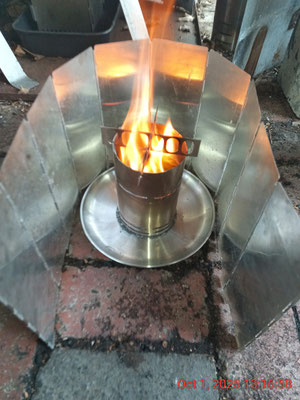
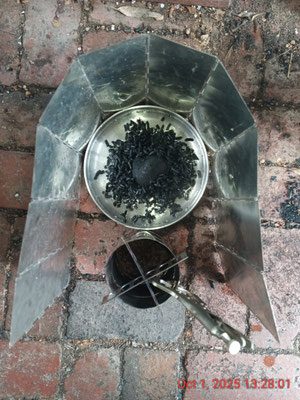
Tech specs
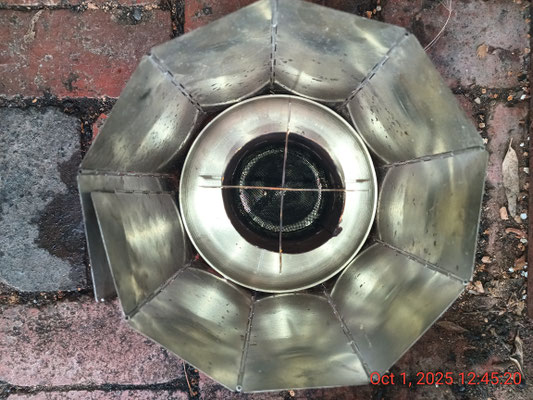
- 9" ss quench plate (OTS)
- quench water collection
- food plate
- 304 ss cone (not needed for environmental fuel)
- removes the wood pellets from the central bottom, which weren't pyrolysing, to ensure 100% Biochar recovery after a burn
- 0.6mm 4" 304 chimney flue (grinded)
- width:height, 100:150 (2:3)
- 10, 20 primary air slots
- 100 secondary air slots (secondary air slot height to stove height, 100:150, 2:3, more important than tube width:height ratio)
- 150 high
- grinded top notches for pot stand
- Permastove V4 pot stand (upgrade to 2mm) (2D laser cut)
- stove weight (with pot stand): 243g
- heat and wind shield (OTS) (24cm high, 10 pieces)
- C clamp (OTS)
- secure heat and wind shield
- pour the billy (billy lifters)
- lift the TLUD after a burn to empty the Biochar into the quench water
- 2L SS Zebra billy (OTS)
- water (possibly pasteurized with a 2L teapot billy instead)
- food
- stove fits inside (without the plate)
- wood pellets up to 90mm high at 330g (with cone), 400g (no cone)
TESTING
Max fuel capacity test run for 330g of wood pellets (1cm below row of secondary air slots)
1st burn
- ambient temperature 14degsC
- gusty wind
- bottom cone, SS plate quench collector
- burn time: 32m
- Biochar recovery: 100%
Fuel
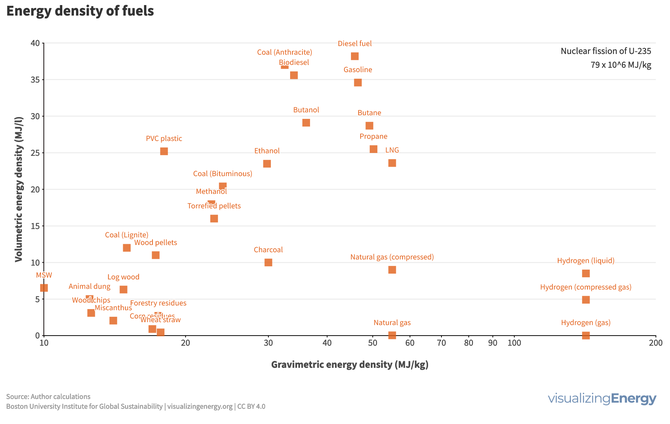
As you can see, wood pellets have a relatively low volumetric and gravimetric energy density compared to other liquid and compressed fuels. But - in most cases produced from sawdust - a 'waste' stream from sawmills, which may or may not use sustainable forestry practices eg.FSC certified. Safer handling too than most other fuels. May need to research your pellets. In Australia, it's an emerging fuel source with a small number of options for Australian produced, affordable and large bags eg.15kg. Balancing all this, get the wood pellets that are also closest to you for the smallest logistics C footprint.
Alternatively, if you're in it for the long haul and can access locally produced sawdust or rice husk (or Cyanobacteria on Mars), you might consider buying a small and electrically compatible pelletiser machine that can process your biomass feedstock waste. Most of the pelletisers are from China. Not sure about their reliability. Plus there is postage cost, dubious warranties and potential customer service issues. Can be expensive but over time possibly save you money if all the ducks line up and depending on how much pellet fuel you are consuming. Bags of pellets, produced by your pelletiser, could also be locally bartered or sold.
With my recent design of the Navigator 'Backup' V4, using 3D laser tube cutting, I would argue now that there could be many more jobs in the biomass fuel pellet circular bioeconomy than stove or even kiln manufacturing, which will probably use increasingly more automated machines and processes for production.
Large kilns, possibly continuous, possibly trough (hybrid) or rotary, producing biochar and waste heat, used for space heating and bioelectricity via heat exchange with Stirling Engines eg. https://frauscher-motors.com/ is all possible.
What do you think?
More information about clean stoves can be found here, with some great info under 'Publications'.
http://aprovecho.org/resources/
Conclusions
Overall, the Navigator 'Backup' TLUD stove could be a success in the future for many use case scenarios, such as outdoor kitchens for primary or backup use or car camping.
The Navigator 'Light' TLUD stove is suitable for backpacking and trekking for Australia and many other Countries where there are various camping and trekking options (subject to local fire regulations)!