
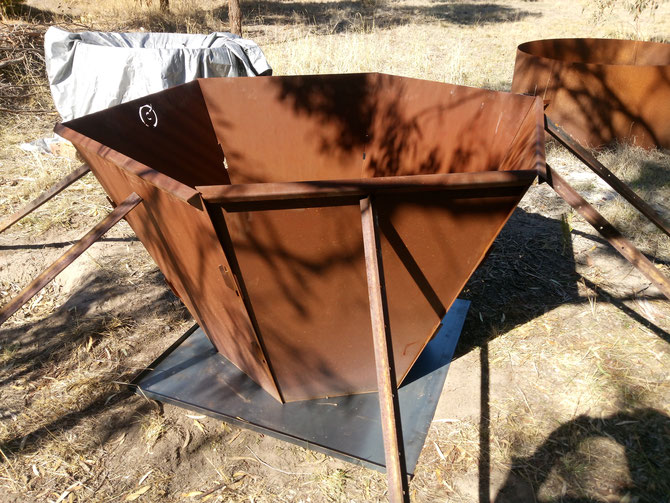
The Flat-Tiki 'Carbon' V1

A hexagonal flat-packable biochar kiln. Panels (13.5kg each) can be transported in the back of a station wagon, trailer or moved around in a field. Volume is 1438L. Built with 2mm hot rolled and pickled steel (but with hindsight not recommended - 2mm is too thin - the kiln warped at the base and pickling offers no increase to tensile strength plus it uses an acid bath which is environmentally toxic).
Both graphene (made of Carbon atoms) and beehive cells/honeycomb use hexagonal geometry - the least material needed per shape perimeter/walls, high stability and presumably optimal volume too. These design principles were integrated into the Flat-Tiki 'Carbon'

The Flat-Tiki 'Carbon' V2
Modifications made to V1: 2mm hot rolled mild steel has been upgraded to 3mm HW350 'weathering' 'corten' steel - which doubled the cost but is not pickled, can be left assembled outside in the weather for a semi-permanent installation (gains a rusty patina but will not rot to the core) and has a higher: yield strength (the point at which the steel deforms) at 380-430 MPa, tensile strength (the point at which the steel might break) at 520-570MPa and has significantly less 'scaling' compare to mild steel at higher temperatures. So, the kiln should last much longer without any warping issues compared to V1. The key/slot system has been simplified from 3 keys/slots to 2 keys/slots per panel side - seems to assemble much more easily compared to V1. The keys are now more robust - longer and wider. Slot size is more generous in width, though perhaps a little too generous with wiggle room to allow easy key insertion and handle the increased width of 3mm steel. The panels have been reversed in assembly with the double folds now on the outside - this enables an anchor point for using star pickets to stabilise the panels during assembly. Assembly requires that the kiln is surrounded by soft ground in order to anchor the star pickets (using a sledge hammer) but the surface beneath the kiln needs to be level so that all panels lock in correctly. This can be achieved using a base plate (see below). The base will also increase the temperature of the fire by reflecting heat back into it and also create better insulation for the baking process eg. 24 hours, following a burn.

The Flat-Tiki 'Carbon' V3
Wider keys, narrower key gaps and smaller slots. Wide slots for removable (last) panel. I will use 3mm hot rolled steel for rental kilns since they are AUD$160 cheaper than kilns made from weathering steel and will only be erected for 24 hours so they won't be left outside to rust for any extended period. I was quoted AUD$505 (inc. GST) for V3 off 3mm hot rolled steel. Can't wait to build it! The 'Carbon' V3 should be perfect for converting agroforestry and vineyard waste to biochar!
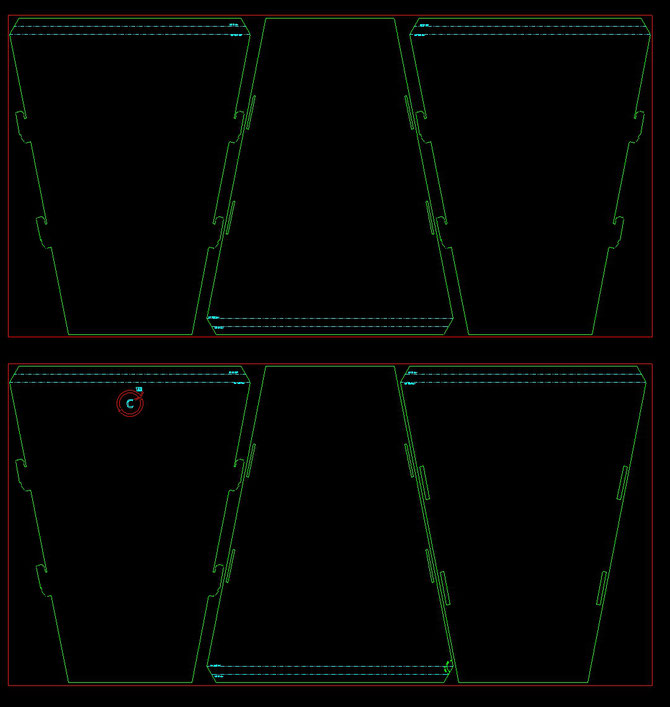
The dxf can be viewed in 'DWG Trueview' or 'DWGSee Pro 2023' in Windows, 'DWG Fastview' in iOS and 'DWG Fastview' or 'CAD Assistant' in Android. Ready to be printed on a CNC Plasma cutter or even better, a CNC Laser Cutter, preferably a 500W fiber optic laser cutter (see below) that cuts up to 6mm Carbon steel and 3mm stainless steel - also handy for cutting TLUD components eg. 'The Permastove V3' (see on the 'TLUD (Top-Lit UpDraft) stoves' page)! I would predict from my preliminary research that laser cutters can be found in many major cities in most industrialised nations. A global survival technology combination in a nut shell. If the fiber laser cutter doesn't exist then consider buying it with aid and development funds from industrialised nations (that created most of the world's Carbon pollution in order to climb up the energy ladder)...Please note that if you want to 'significantly' modify the design, skip prototyping V3 and produce 'Carbon' V3 knock-offs, please acknowledge Permachar original authorship of the 'Carbon'; 'Kon-Tiki' and 'Moki' origins and the Creative Commons 'Attribution 4.0 International License' and please remove my logo - no voluntary AUD$50 payment per kiln produced will then be required. However, from an R & D perspective, modification of the 'Carbon' V3 at this early stage is not really recommended until it has been prototyped by a number of users for at least 6 months. The 'Carbon' V4 can then build on user feedback and become a better and more open source kiln (like the 'Eve V' tablet computer) than what it is now with no voluntary payments required for beta testing (unheard of in the software community - sorry about that) and producers can put on their own logo - muddy waters but allows producers to take a degree of ownership of the kilns they sell. Subsequent versions of the 'Carbon' will be left to the user community to develop (while acknowledging Permachar original authorship of the 'Carbon'; 'Kon-Tiki' and 'Moki' origins and the Creative Commons 'Attribution 4.0 International License')...A focus then can also be made by the user community on setting up 'Carbon Credits', 'Carbon Removal Certificates' or 'CO2 certificates' (various schemes to think about eg.nori.com, biochar-journal.org/en/ct/88) for the users who produce biochar (based on the amount of biochar they produce) with the 'Carbon' kilns (or other relatively clean biochar kilns or cleaner biochar kilns such as the Kon-Tiki cone - think 'Clean emissions' V 'Logistics' V 'Jobs' V' 'Growth' V 'Prosperity' V 'Happiness' V ... - what will be the optimal combination to drawdown Carbon?) therefore both kiln producers and kiln users would be financially rewarded and the planet might not overheat ;)
Preparation, Assembly, Operation and Emptying notes for the Flat-Tiki 'Carbon' V3
Preparation
*Fire safety
-use a solid metal fire rake to remove ground debris at least 5 metres around the kiln and make sure no overhanging branches are above the kiln with a clearance of less than 5 metres. If you've got a wheelbarrow, place the raked debris in the wheelbarrow and shift to a burn pile at least 10 metres from the kiln
-Have a pile of soil in case of emergency fire snuffing
-Get a backpack sprayer filled with water on standby in case of spot fires OR if near a water tank, attach a small pump and get an adequate length of green line 1" rural pipe that will attach to the pump outlet and reach around the circumference of the kiln
-Buy or borrow a pair of welding gloves for operation (the long blue ones) - the kiln flame has been known to 'jump out' of the kiln and reach your hands
-Clothing - don't wear any synthetics - preferably heavy organic cotton
-Work boots - If you're in Oz, Rossi or Blundstone are always handy - just make sure they are steel capped
-Safety glasses - always good when dealing with fire and feedstock
*The base/foundation
An imperfect/uneven foundation may lead to an air gap between 2 or more panels. Choose a relatively flat area of ground within a 5 metre vegetation clearance next to and above the kiln spot and create a fairly flat 1.2m x 1.2m square eg. remove rocks, tufts of grass and smooth out the soil with a shovel or rake. Place the base plate on top of the fairly flat square. This will now provide a perfectly flat foundation for the kiln and reflect heat into the fire plus insulate and reduce heat loss during baking
*Snuff layers
-Have the snuff layer ingredients within 1 metre from the kiln for easy access - just shovel on top of the fire!
-This is definitely an experimental area. I've been using a combination of bentonite clay (layer 1) and Jeffries Veggie soil (Layer 2). Could even add some biochar on top once you've stockpiled enough
*Feedstock management
'Catch and store energy', 'Obtain a yield' and 'Produce no waste'.
Essential equipment
1- Chainsaw and related accessories
Good for initial processing of biomass eg. forestry waste, vineyard waste etc.
The Stihl brand is probably the way to go...a cordless electric if you can afford it! A cheaper option is the Ozito dual 18V 4.0Ah electric chainsaw. Spare chains can be bought from Bunnings or eBay. The batteries can be used in other Ozito power tools like the cordless electric circular saw (see #4) and jigsaw.
2- Curved handheld tree saw
Handy when you are collecting forestry waste eg. small dead branches that don't snap off cleanly or for pruning lower branches larger than 10-15mm that can't be easily cut with a chainsaw
The Spear & Jackson brand will do the job nicely
3- Loppers
Handy for pruning lower and higher branches less than 10-15mm.
The Fiskar brand is a little expensive but includes a high quality steel cutter and extendable handles
4- Cordless battery-powered circular saw.
I only use the saw on feedstock that can't be broken with two hands or across my shin. If it's more than a couple of inches thick I tend to stack it separately for cutting with a chainsaw and use it in my pyramid kiln or combustion heater.
The Ozito brand does the job very nicely and they're relatively cheap - worth buying the 18V 4.0Ah battery as it lasts longer in the field and can also be used with other Ozito powered tools. It's a bit dodgy but I removed the safety so you can have one hand operation and hold the feedstock with the other hand. I also updated the blade so it now has 36 teeth which works better on smaller diameter branches
5-Moisture meter.
Ensure the feedstock is less than 20% moisture content - can use a pronged moisture meter from China eg. MD-4G. The less moisture the feedstock has the faster and more cleanly it will combust
Solar drying
-Create long windrows of feedstock along East-West so they are North or South facing
-Cover the windrows with heavy duty tarps if bad weather approaching and secure with anything heavy you've got eg. Besser blocks, long wooden poles, bricks, rocks, logs etc.
Shed drying
-When the feedstock is dry, if you've got a large shed then move it by wheelbarrow into the shed - This will remove a final percentage of moisture in addition to the solar drying. Only bother to shed dry if the shed is within reasonably close distance to the site of the kiln so there is efficient transportation of the feedstock to the kiln
Kiln assembly
-Careful moving panels - don't drop them as the keys might distort on impact (however the V3 keys should be strong enough to take a fall)
-Assemble on top of the base plate
-Assemble with panel folds on outside, use to secure 7 x 1.8m star droppers for balance during assembly and use
- 2 person assembly is much easier than 1 person (can be done but not as fun)!
Here goes:
3,2,1
3
Assemble first 3 panels. Keyed panel in middle first (logo panel), lean against a fold on base plate to steady and support with 2 star droppers. Drop in second and third slotted panels on
either side and add star dropper support to each panel centre top
2
Attach one keyed panel with star dropper support at centre top on one side and one keyed panel without a star dropper on the other side. May need to reattach star droppers on second and third
panels
1
Drop in final (slotted) panel with 14mm slots - first side drop onto keyed panel without star dropper - probably will need to move both of the panels around a little for insertion. On the
second and last side of the slotted panel, drop onto keyed panel with star dropper. Once the final panel is in place, add a star dropper at centre top to secure it. This slotted panel
(opposite the logo panel) will b lifted and removed when emptying the kiln, hence the 14mm slots for easier access.
Operation
-When filling kiln before ignition, don't need to process feedstock - put it straight into the kiln
-Follow the Kon-Tiki operating instructions Here
-Burn until biochar is up to the top of the top key/slot. This will provide enough space for the snuff layers. The fire doesn't get too hot as well as it would if it was filled to the top.
-Baking? Experimental. The closer you get to Terra Preta de Indio (or rather, Terra Preta Australis) the better it is for growing plants. I've got to do some testing but I'm thinking at the moment that 24 hours should be long enough. The baking breaks the biochar into smaller pieces which increases the overall surface area which is good for almost every application. I'm also going to try baking without soil on the outside since the 3mm steel should provide adequate insulation for 24 hours - needs to be tested (maybe at 6 hour intervals with a laser 'infrared thermometer', also available from China for a low cost eg. The 'dodocool' GM900 works well and cost about AUD$30
-Snuffing will not use water i.e. these kilns will now be 'water-free' (with the exception of a backpack sprayer for spot fires/dousing the biochar after emptying). This saves on water,
allows more remote field deployment and protects the 3mm hot rolled steel from corrosion and rusting.
Emptying
-Ensure original 3 panels assembled are still supported by star droppers
-Remove star droppers on keyed panels adjacent to the last panel (14mm slotted) assembled
-Remove star dropper on last panel
-To empty kiln, lift up the 'last panel' that was assembled and remove.
-If using the 'Carbon' in a semi-permanent/permanent setup:
- scrape off the snuff layers and shovel into a pile 1m from the kiln for the next burn. This will economise the use of snuff ingredients and reduce transportation demands, OR
- transport snuff layers to TPM
- unmilled biochar for biochar aquifers eg. PKG, TPS
- milled biochar for TPM, TPV
- separate the snuff layers and biochar then shovel onto trailer, ute or bag it up for car transport.
- Can use a backpack sprayer filled with water (and inoculants - bonus) (or 1" rural pipe 'gravity fed' from a nearby water tank - or even water from a 'Furphy') to water down the biochar (after removal from the kiln) before transport or bagging in order to cool it down and prevent 'spontaneous recombustion' (biochar goes up in flames again).
Suggestion for approach to securing funding for biochar projects
The bottom line of what most funds are looking at:
1. What you want to do?
2. Why do you want to do it?
3. How will you do it?
4. How much will it cost in total? Break down what money you will spend on each activity? The timeframe of when those activities will happen and end?
5. What people will benefit from the project? How many people?
6. Who will be your implementing partners?
7. What are the potential risks that can occur throughout the project life time?
8. What are the levels of risks, high, medium or low?
9. How will those risks be minimised or avoided?
10. What are the contributions in cash or in-kind? How much?
There are additional considerations too such as ecological benefits and benefits to women and children.
500W Fibre optic laser cutter specs (supplied by 'StyleCNC')
2. Raycus laser source 500W
3. WSX laser cutting head
4. Taiwan Delta servo motor
5. Taiwan APEX gear rack
6. Taiwan Hiwin 30mm square rail with flange (original)
7. Japan Shimpo reducer
8. Taiwan AirTAC pneumatic components
9. France SCHNEIDER electric components
10. Cypcut control system with software
11. Automatic lubricating system
12. Double control water chiller
13.Machine weight 2500KG
Production of biochar-making apptech and uses of biochar

What's the marketing strategy?
The neverending question. I've thought about this many times and I think it depends on where you are and what resources eg. laser cutter, steel, feedstock, land, people etc and market you can access. As a basic approach though, I would say start yourself with one 'Carbon' kiln, stockpile many litres of biochar or Permafert, sell it to the locals and build interest and your market, take the profit and build a few more kilns with accessories (see below) and start a 24 hour kiln rental service, do some cheap biochar-making demonstrations for the public with a rental kiln, rent for a season then hopefully people will want to buy them for their properties if they can justify it's benefits eg. establishing agroforestry systems, new vineyard polycultures etc. If you're feeling really energetic, use profit from all of that and if you can access cheap 'clean'/'toxic chemical-free' 200l HDPE (#2) barrels, start a food/medicine plant production business as well (see the 'Permachar Kitchen Garden' tab)! Value add where you can and you might even make the planet greener and fairer than the planet that you inherited...
Biochar kiln and stove production logistics
'The Permastove V3' (see the 'TLUDs (Top-Lit UpDraft) stoves' page) is more complicated to build compared with the 'Carbon' V3. There are more parts and more things need to be done to the metal. I've been told that the double fold on the 'Carbon' V3 is tricky but doable for a skilled press brake operator. 'The Permastove V3' however requires rolling, bending and welding in addition to laser cutting (which is a skill in itself). I'm thinking that 500W fiber optic laser cutters could be purchased in a given region and located at a centralised workshop for both the kilns and stoves. 'The Permastove V3' could be distributed as a flatpacked kit to local workshops that can do rolling, bending and welding. These workshops could then act as stove and fuel distrubution hubs. For stoves, I prefer this model over a centralised workshop that does everything but only creates distant jobs through the biochar related supply chains but in some cases centralisation may be the only option. It makes more sense to do the cutting and folding of the 'Carbon' V3 at a centralised workshop then distribute it from there. For both stoves and kilns it depends on local preferences too eg. What's the most appropriate way of doing business? Where is the unemployment? What transportation links are available? Most importantly, where is the market?
Rental notes
I think a good rental service will provide the following equipment to the customer:
-Kiln and base plate
-Star droppers
-Sledgehammer
-Welding gloves
-Backpack sprayer
The customer could provide:
-Ingredients for snuff layers
-Water for backpack sprayer and inoculants
-Shovel
-Wheelbarrow/bags
-Firelighter/newspaper
Please share some money...
All this Research and Development (R&D) takes time, perseverance, passion and money. I want to provide good user support too...If you sell kilns or rent kilns (which is what I am going to
do), please let me know so I can put the kilns on a map. I'll also establish an online forum for a 'Carbon' user community once there are enough prototypers/beta testers to justify
it. Please share some money for further 'Carbon' kiln R&D via a paypal account (free and easy to set up if you don't have one) at the following web address (URL):
paypal.me/permachar
or just click the link below... A recommended amount is AUD$50 for every 'Carbon' V3 kiln manufactured. Thanks!!