
Introduction
Top-Lit UpDraft (TLUD) stoves and kilns are a great way to produce biochar. I built my first TLUD stove, the Permastove V1, in 2009. For the last 16 years, off and on, I've been striving for TLUD perfection. There's a number of different applications for TLUDs whether it be cooking, water treatment eg. pasteurization (WASH) or producing larger batches of biochar in TLUD kilns, such as a 200L oil drum reactor (various designs available). Design is based on a set of principles that are outlined in the next section which I highly recommend reading before starting out on your TLUD journey, if you haven't already. I also highly recommend visiting Dr TLUD's web site at: https://woodgas.com/
for a bit more background into the history with some designs on offer.
In 2025, I have been pursuing a TLUD stove on the institutional scale that can efficiently pasteurize water. My latest design is posted on the 'Bush Survival System' page.
I've made a list of variables for pasteurization time and temperature achieved which I understand are determined by:
- TLUD/pot stand integrated system
- heat/wind shield around TLUD
- feedstock type eg. pellets, sticks, manure etc.
- feedstock Energy Density (ED) eg. Wood pellets have higher ED than rice husk pellets
- feedstock Moisture Content (MC) eg. Ideally less than 15%
- feedstock amount (determines feedstock weight and limited by maximum reactor volume below secondary air slots/holes)
- feedstock particle size
- airflow between feedstock particles
- pasteurization device eg. 15 litre stainless steel stockpot (plus heat conduction/exchange at the base)
- environmental factors eg. Ambient air temperature, Relative Humidity (RH), water temperature, wind etc.
- others not considered
Also, every new TLUD system needs to be tested, ideally with different fuels. In the case of biomass pellets, if more people are using biomass pellet technologies, the demand for the pellets will increase and the production of the pellets will increase too (facilitated by plenty of unused 'waste' sawdust and rice husk in many places) and the cost of the pellets should go down which I hope happens in Australia. If you can afford an ideally electric pelletiser eg.N-PICO and have access to sawdust, rice husk, sorghum leaf etc. then you can make your own pellets for next to nothing while you offset the cost of the pelletiser with the fuel you didn't need to buy and have fuel security! Potentially a single pelletiser could provide biomass pellets for an entire village or community but would need to be sized up for the demand.
Materials
6 key materials, off the shelf (in Oz), to get you started:
- Stainless stockpots (steel grade varies) eg.15L/50L/100L
- Stainless 304 chimney flue eg. 6"
- Stainless 304 (exhaust) pipe/tube eg.4", 5"
- Sheet metal eg.304
- Stainless woven/welded mesh eg.304
- Oil drums (mild steel) eg.20L, 200L (may have to do some 'Gumtree' hunting)
The Permastove V1
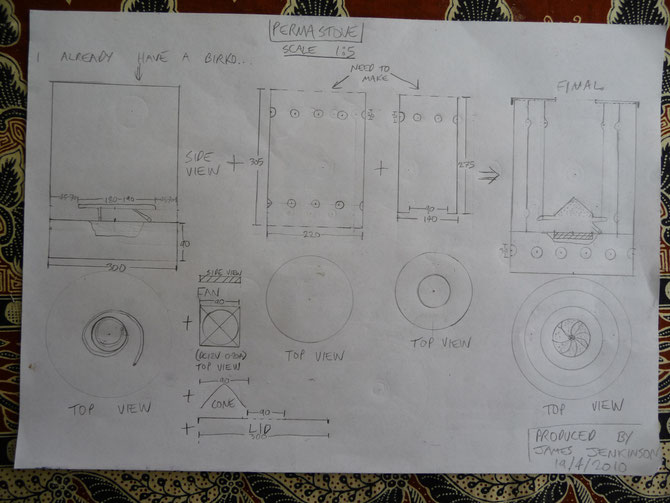

The Permastove V2
The Permastove V3
Features:
-A 20mm insulation air gap that should increase fuel efficiency while at the same time radiating some heat off the middle cylinder to the outer cylinder. The outer cylinder should be safe to touch while the stove is in operation. The theory is using a 3 cylinder stove creates a sweet spot for metal lifespan, fuel efficiency and safety. Need to compare water boiling times and outer metal surface temperatures with and without the middle cylinder
-The handles are double so 1.5mm goes to 3mm which is hopefully thick and robust enough. The double welded tabs should provide strong attachment of the handle to the outer cylinder - maybe orientate North-South so they don't act as hinges when the stove is tipped over!
-An independent pot stand that is suspended above a 1.25kg Milo tin riser and 'Permastove'. The legs are made from bamboo (any variety) and the metal cross should be able to support flat-based pans as well as round-based pans/woks. If the fuel runs out, the 'Permastove' can be easily removed and replaced with another 'Permastove' (with fuel) without any need for moving the pan/pot/wok during cooking.
Updates:
-The lid tabs could be screwed into the outer cylinder with 3.2mm x 20mm galv screws which would help anchor the cylinders, increase pressure in the secondary air gap by reducing air leakage at the top
-For USB fan control I found this: https://www.coolerguys.com/products/coolerguys-manual-speed-controller-for-usb-fans It means now you can adjust the (5V USB centrifugal computer) fan speed which will adjust the flame size for better cooking control - just like a deluxe gas stove ring!
-2 spare grates per stove. The inner cylinder will eventually wear out from exposure to fire and need replacement at some stage but probably not before the grate will burn out in the middle. Replacing the grate will extend the life of the inner cylinder. For convenience the central grate should be able to be snipped out with good tin snips and replaced with a spare one that can be screwed in with 3.2mm x 20mm galv screws (can be purchased from Bunnings).
-The power bank could be the 'Zendure X6' or 'Ultron'
-The power bank could be powered from a 60W Megasolar PV panel which has USB C PD output, DC and USB A
-Why not a TLUD dehydrator? There's always the ol' solar bed frame...
-Why not a solar oven when the sun's shining and a TLUD when the sun's not shining?
Where's the CAD for 'The Permastove V3'?
I'm still saving up dollar to prototype 'The Permastove V3'. Information will be provided during the prototyping stage as there may need to be final adjustments to the CAD - which might be posted if I think the stove is worth mass producing!
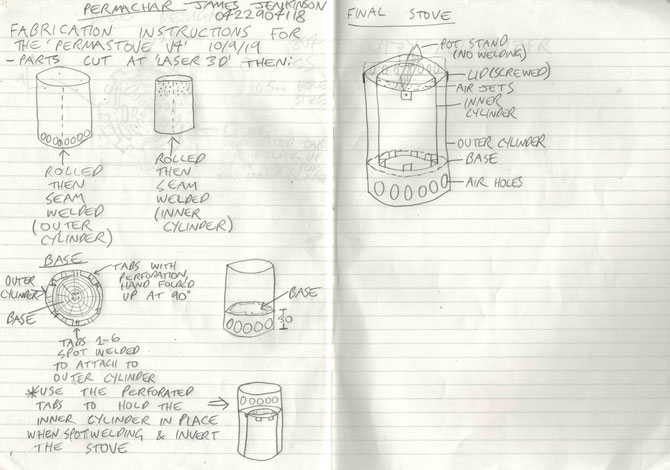
The Permastove V4
The 'Permastove V4' is a '4 in 1' stove for
(1) multiday trekking/hiking/backpacking, solo or group. Day/overnighter trekking/hiking would be better served with the 'Ohuhu' TLUD stove which can also take solid fuel tablets eg.Hexamine as a backup. Note that biomass stoves probably shouldn't be used during the fire season (unless indoors)
(2) car camping
(3) backup stove for the household (if you already have a stove connected to the grid)
(4) primary stove for the household (if you're off grid)
Features:
-lightweight: made from 0.9mm 304 stainless steel - very durable too
-portable
-multi-fuel: can use plant waste (biomass) from the environment while trekking or use fuel pellets if you're alpining eg. sawdust, rice husk, coffee bean pulp etc The base/grate has many small air holes so all types of fuel won't fall through
-light ecological footprint (offsetting Carbon released by unsustainable sources and technologies eg. fossil fuel based transportation, energy production, agriculture et al like deforestation/land clearing...)
*fuel efficient with clean emissions (smokeless) via passive/non-pressurised micro-gasification (uses primary and secondary air supply)
*produces biochar (as a by-product of pyrolysis via water boiling/cooking). This can be left in the environment and will lock up Carbon for hundreds to thousands of years (eg.35,000+ years) reducing the impact of climate change/chaos
*no non-recyclable fuel (gas) canisters to deal with (that usually get turfed into the environment)
-no moving parts eg.no fan or any electronics
- to reduce volume in bag: fits in all sizes of billies eg.1.4 litre, 2 litre, 3 litre; Sigma 2.7/3.7 litre pots; Pathfinder GEN3 bottle/cup nests inside the inner cylinder
-replaceable inner cylinder
-replaceable base/grate
-works well with a heat shield that is elevated above the air holes on the outside of the outer cylinder
-creates local 'Green collar' jobs along the supply chains eg. fabrication, biochar collection and application

Prototyping will be done over the next few months.
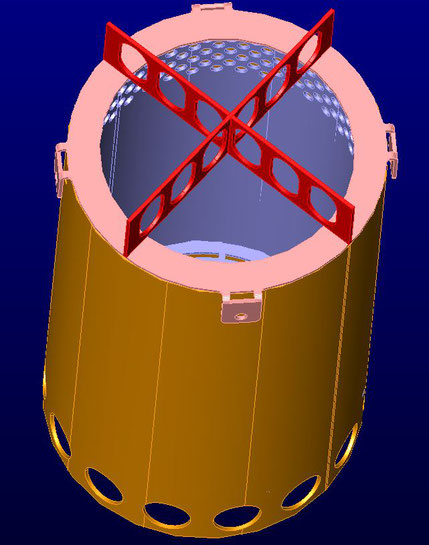
Note that the 3D model is for illustrative purposes only. Unfortunately, a software bug prevented lining up the base perfectly central with the inner cylinder - it's not a design fault :)
The Permastove V4 prototyping notes
26/10
Managed to get a burn for 2 hours 40 minutes using wood pellets. The fire took about 15 minutes to stabilise. I used a ss bowl with ss pollen mesh lid, filled with water, on the stove and it was able to get up to boiling no problem. I had to top it up every half an hour to replace evaporated water lost during water boiling. I used a hexagonal heat shield around the stove/bowl which protected the flame nicely as it was a little gusty. The wood pellet biochar produced from the burns looks like good quality which I will need to test in a lab for confirmation. The air jets worked ok during the burn but only worked very effectively when the pyrolysis front was near the bottom of the reactor/inner cylinder. Presumably, this was because there was more airflow available to the fire and more wood gas was getting sucked up to the air jets. I'm going to try sealing the stove lid with high temperature silicone which I think will increase the secondary air pressure in the air gap and through the jets which will add more oxygen for cleaner and hotter secondary air combustion. I'm also going to try adding a fan when it arrives and close off the outer cylinder air holes at the base. I hypothesize that the forced air/fan assisted burn will produce faster pyrolysis, shorter burn time, higher temperature fire and improved secondary air combustion.
5/11
Run time was 1h40m. Shorter compared to the first run due to better secondary combustion now that the lid is sealed properly with high temperature silicone on the top/outside edge. The silicone shows no loss of structure after the burn which may have even helped bed in the silicone. The wood pellets with kerosene shaken in a small container worked great as a firestarter. These charged pellets were placed as a thin top layer on top of the rest of the wood pellets up to the level of the first air jets. The heat shield worked perfectly. The Pathfinder boiled in 5 minutes but I allowed it to boil over which almost put the fire out. So. needs to be removed with leather gloves before boiling over. When the fire began to smoke, that signalled the end of the burn. At this point, I poured the pellets into a bucket with water. I never pour water directly on to the stove as it will deform it while it is hot. The resultant biochar looks clean and crumbles cleanly which is a good sign.
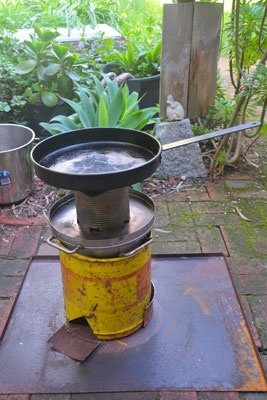
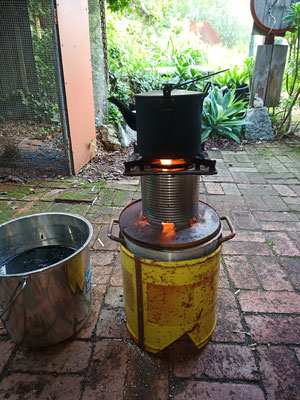
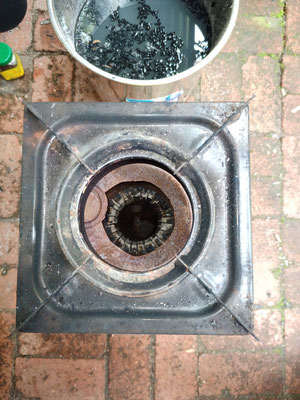
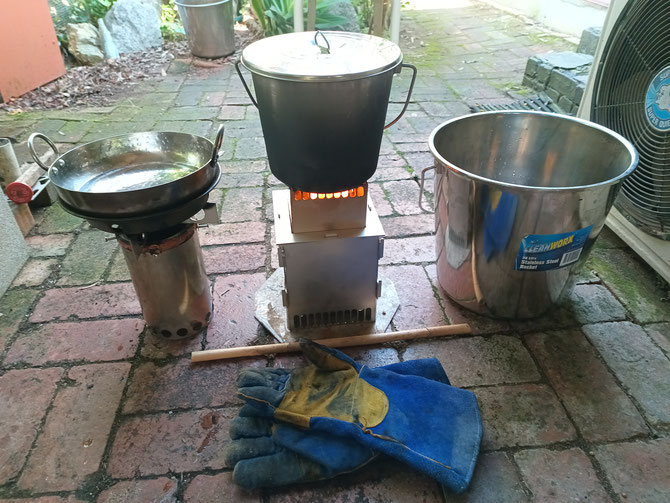
Outdoor kitchen with the Permastove V4
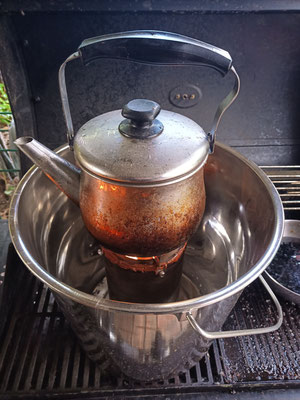

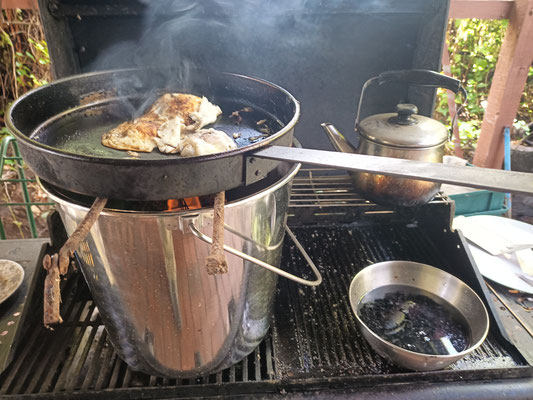

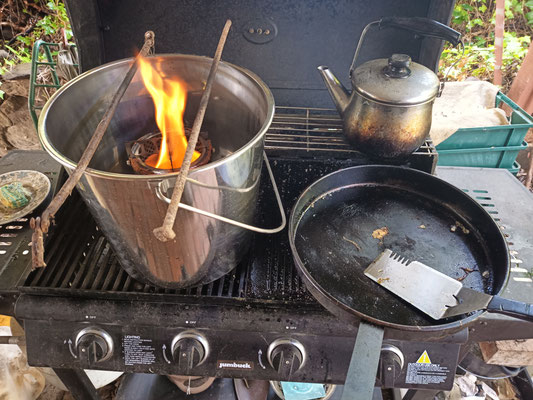
So here's my latest attempt at a TLUD outdoor kitchen, perfect for an alternative/backup way to cook at home or for car camping or base camping at lower altitudes (with a lightweight heat shield (no bucket) and using the TLUD as a portable stove, using environmental biomass as feedstock (for even more mobility) or carrying in solid fuel wood pellets). I used a 20 litre stainless steel bucket as a heat shield/reflector, wind shield and 'base plate' for stove stability. Buckets have many uses! I filled the TLUD half full with pine sawdust solid fuel pellets from 'BBQs Galore'. I used a Livingstone frypan from 'Snowy's'. A 'Barbie Mate' (found in many shops in Oz) for flipping the eggs which is also a very useful BBQ tool. I used a standard mild steel kettle for boiling water for that tea/coffee/hot chocolate, rehydrating instant food, doing the dishes afterwards in the bucket (after the stove has cooled down and removed). I used a couple of reclaimed mild steel rods as a stabiliser for the frypan and air spacer, allowing plenty of air for the pyrolysis in the stove. The wood pellet byproduct of pyrolysis is biochar which can be added back to the Earth/collected for many other uses eg. pot gardens, humanure toilets, water filtration et al. for a 'Carbon negative' kitchen, offsetting fossil fuels for cooking (or even if the BBQ gas bottle runs out) and reducing Carbon in the atmosphere and using it in a 'cascade of uses'. I should mention too that this is a completely solid state system with no moving parts and no electronics to fail.
If you are interested in purchasing one or more stoves, I have parts for four (4) I can fabricate. Please use the 'Contact' form to get in touch and I can do you a deal...
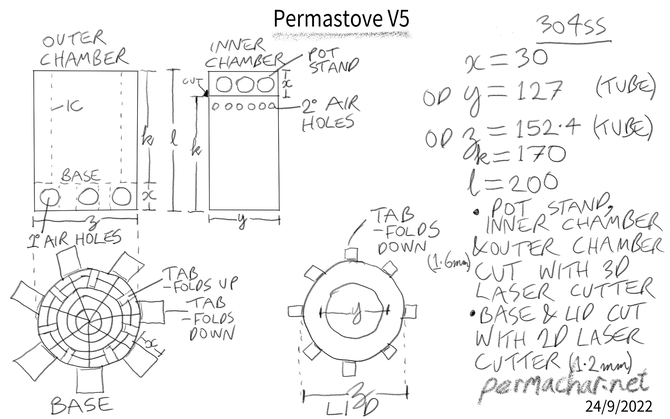
The Permastove V5
This rapid prototyping is addictive and expensive. So, the prototype of the 'Permastove' V4 was 2D laser cut, rolled and welded. It turns out that my laser cutter has a 3D laser cutter for tube. A couple of wise men recommended I used preformed tube for the chambers to save cost and I think they are right in terms of what's appropriate and available. As I've mentioned before, a good design should take into account locally available tools, materials and labour. So, it is appropriate that I redesign V4 to take advantage of 3d laser cutting and available 304 stainless steel tube in South Australia. Ideally in the future it would be Carbon negative 'Green steel', using Australian iron ore and manufactured in Australia. One can only hope...
So what's in V5?
*Still a multi biomass fuel stove that produces biochar as a byproduct of pyrolysis/burning for a Carbon negative footprint
*The smaller version is suitable for single/multi-day trekking or a backup household stove.
*The larger version is suitable for car camping, base camps for group trekking or a primary/backup household stove.
*1.6mm 304 ss for the inner chamber and outer chamber - I would use thinner steel but it is not available for 304 ss tubes at these diameters in South Australia (if at all).
*1.2mm 304 ss for the base and lid which should be OK for the tabs and provide better durability than the 0.9mm used in V4.
*Perforated tabs will be used throughout the design.
*No tack welding of the base to the outer chamber. Large tabs on the outer of the base will be folded down to support the inner chamber. The inner chamber will still use tab guides that worked well in V4 but will be longer for added stability.
*V5 won't be Fan Assisted/Forced Air (FA) and remain a Natural Draft (ND) TLUD
*There will be less air jets for secondary combustion on the inner chamber. All these jets are not needed and less of them will save money/less time needed on the 3D laser cutter
*The lid won't be screwed on to the outer cylinder and should fit perfectly with no air leaks using folded down tabs as a guide. No high temperature silicone required either.
*The pot stand will be a circular section cut from the inner chamber with circular air holes similar to the primary air holes at the bottom of the outer chamber. This will be much more stable that the cross design used in V4.
*The smaller V5 version fits inside a 2L (14cm diameter) Zebra billy and the larger version fits inside a 3 litre (16cm diameter) Zebra billy (with a 4cm height overlap). Zebra billies are also made of 304 stainless steel and are available from a number of stores in Australia.

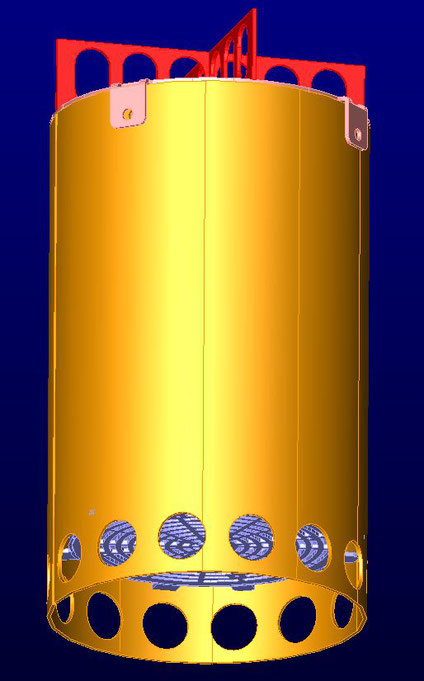
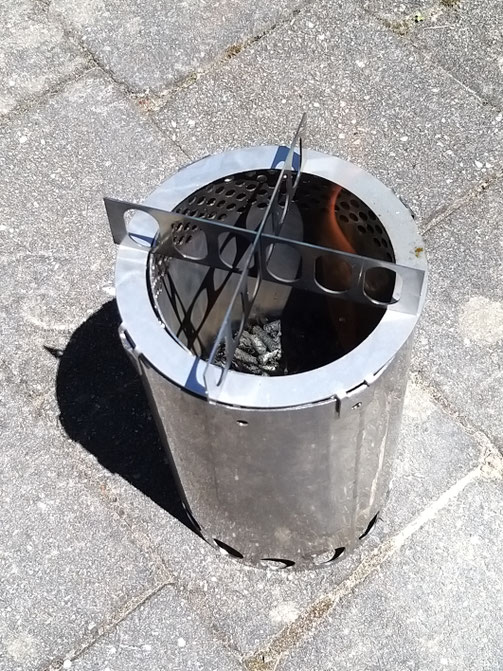
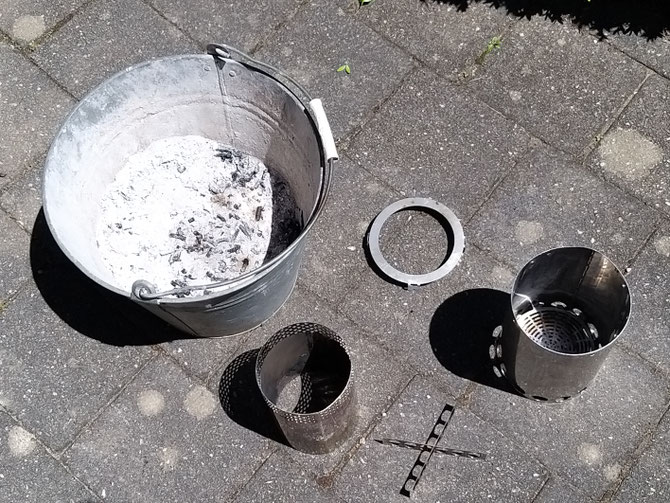
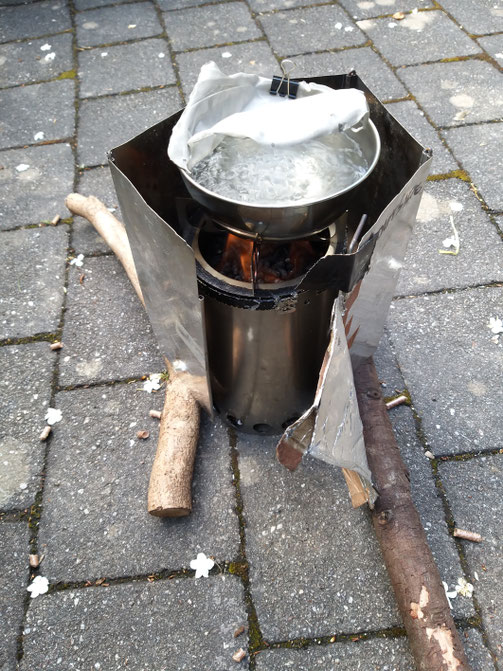
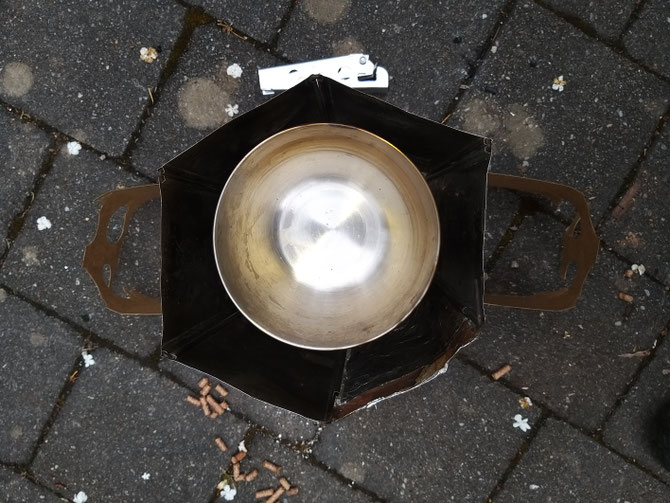
The 'Steelfinder 1' Institutional TLUD
Made using TLUD first principles and some old junk (and a couple of parts from the 'Permastove V1') I had lying around. Works great! Completely 'solid state' during operation - no moving parts eg.fans. No external power source needed - just biomass for micro-gasification during operation. Modular - parts can be assembled and pulled apart with easy replacement if parts wear out. Manual operation.
The bottom air hole system (four air holes that can be opened or closed) allows the user to find the optimal air flow given the variation between feedstocks, moisture content of the feedstocks and amount of flame desired for cooking/boiling water.
Tested with wood pellets, thin bamboo pieces and sticks from an acacia. Good for wok cooking, boils a kettle very quickly and works perfectly with Carbon steel cookware.
https://en.wikipedia.org/wiki/Carbon_steel
Also, I doubt a biochar biocomposite saucepan would work very well...
'Carbon negative' 'Green steel' would be ideal for all the steel used:
304ss for the TLUD two inner chambers (15 litre stockpot and chimney flue section), conical steel mesh base insert and possibly lid; repurposed 5 gallon oil drum made from mild steel; Milo mild steel + tin chimney; mild steel pot holder; Carbon steel for the cookware
Also HW350, mild steel and galvanised steel for the Kon-Tiki kilns.
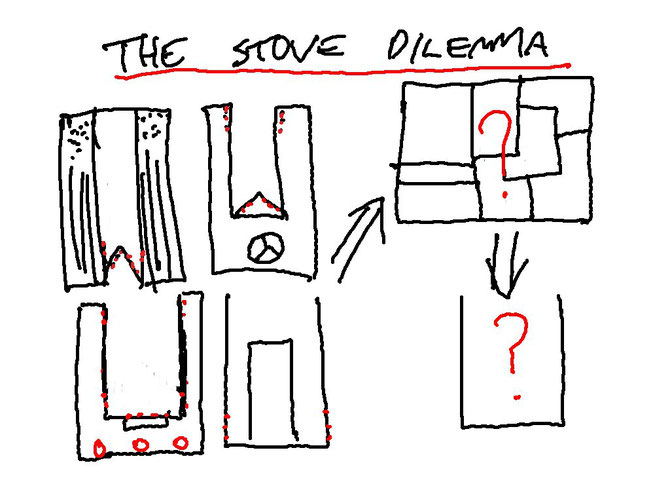
The steel dilemma:
I want to be able to tell customers that both TLUDs and Kon-Tiki kilns follow this new definition I am proposing of a 'Carbon negative technology footprint', taking a 'Cradle to Grave' approach:
The Carbon removed and probably offset over the lifespan of the technology is more than the Carbon required to 'mine'* the raw materials, refine the raw materials, produce the final materials, build the technology with the materials, transport the technology to the user, use the technology then repurpose or recycle the technology at the end of the service life.
*which could include direct air capture (DAC) of Carbon or include biochar Carbon from biomass to produce Carbon-based materials, just to muddy the waters.
But, the longer I wait for the ideal steel, the less time there is for customers/DIY builders/field testers to 'Burn: Using fire to Cool the Earth' (referring to the book by Albert Bates and Kathleen Draper).
An interesting point to note here is that the same technology built from the same materials might have a different 'Carbon negative technology footprint' and that's not even taking into account the Carbon removed and possibly offset over it's service life. So, to avoid accounting confusion, maybe a more Carbon negative inclusive definition of 'Appropriate Technology' is needed. Any ideas?
At the end of the day there are many factors at play in producing the first not Carbon negative 'Green steel' in Australia - in fact, it has been achieved by SIMEC Mining in Whyalla,SA, which they describe as being 'low carbon intensive'.
https://www.aumanufacturing.com.au/first-greensteel-pellets-made-at-whyalla-steelkworks
'Carbon negative' should be the end game but it's a great start for Australia and the rest of the world!! I couldn't help chuckling when I read the name of their pellets as 'GREENSTEEL' - great for SEO rankings :)
What to do with the biochar?
Biochar produced as a by-product from the TLUD can be used for water and air filtration if needed (then down a cascade of uses) or straight into a piss bucket for 'hot charging' the biochar with Nitrogen for fixation plus Carbon removal and fertiliser or into an indoor or outdoor humanure system then onto the garden for Carbon removal and fertiliser not to mention all the other benefits highlighted throughout the website.
Note other ingredients could be added to the piss bucket or humanure system to customise the biochar fertiliser. See the 'Permafert' page for some ideas...


The 'Tread Lightly' stove

The stove mainframe for metal 3D printing. I reckon in 5 years (2028) it will be economically viable but it could be sooner or later. Just depends on the 3D printing tech and the cost of the metal powders. The only support structures needed were for the flat ring on the base. The ellipses and 55 degrees minimum angles worked perfectly for the plastic prototype. I would say at this point it's a fairly niche area. The best option right now would be 3D tube laser cutting and 2D laser cutting - but the tube steel is too thick at 1.6mm for a lightweight stove. Keep in mind too that 3D designs are totally scalable. This design could be used for larger institutional stoves or smaller super light backpacking/hiking/trekking stoves. I should mention too that it's only one part - no parts to lose other than the stove itself when you're out bush. No maintenance either. No volatile liquid fuels. The only byproduct of your fuel, which you could take with you as wood/rice husk pellets, or use locally acquired biomass, is biochar. So over it's lifetime of use I would call it a 'Carbon negative' technology.
In the future, it could be fuelled by Cyanobacteria pellets on Mars or whatever biomass happened to be abundant on a different future Planet.


The 'Flat Permastove'

It's a stove or burner and it makes biochar. I'm using an algorithm I cobbled together, influenced by 'software testing': Research->Design->Build->Test->Develop->Commercialise. I'm currently in the test phase.
The 3D dxf above can be viewed in 'CAD Assistant', which has versions for most operating systems
https://www.opencascade.com/products/cad-assistant/
The Flat Permastove V2 fits and works great!
Contact me if you want the dxf CAD file and we can haggle a reasonable price...
Assembly order
- place the outer chamber on a flat surface
- slide the crosspiece inside the outer chamber all the way to the bottom
- drop base mesh over the crosspiece and position in centre
- place inner chamber at centre
- slide lid around the inner chamber and lock the slots onto the top 4 outer chamber tabs. This will centre the inner chamber and increase rigidity between the inner chamber and outer chamber and
reduce the slim likelihood of warping.
Disassembly order
- remove lid
- remove inner chamber
- remove outer chamber
- pick up grate and tap and empty it into a bucket of water
Don'ts
- don't pour water on the stove
- don't use fuel with high Volatile Organic Compounds (VOCs) eg.petrol to start it
- don't touch the steel during a burn. The inner chamber gets super hot. Wait for at least half an hour after a burn to touch the steel using welders gloves
Fuel
- pellets eg.sawdust, rice husk; tree seed pods, nut shells, corn cobs, briquettes; sticks, bamboo, papyrus (in a ''vertical segment")
- whatever is affordable, accessible and sustainable
User instructions:
- Assemble the stove
- Add the fuel/biomass to the fuel reactor/IC eg.wood pellets, rice husk pellets, thin bamboo pieces, small sticks or a mixture
- Add 3 cotton wool buds + some pellets (if you have them) to a small sealed container, add a dash of Kerosene or white fuel, secure the lid and shake then tip onto the top of the fuel in the
reactor
- Distribute the pellets evenly over the top and move the cotton buds into an equilateral triangle on top of the fuel
- Light the cotton buds eg. a wooden skewer lit at one end
- Add the pot, pan, wok etc. on top of the fuel reactor OR if using a Bakerstone oven box, put in place on the grill/mesh before moving the lit TLUD underneath
- Ready to boil or cook!
- When the flame dies the burn is ready to be stopped in order to retrieve the biochar. Otherwise, the hot coals can be used for simmering (with no biochar retrieval)
- Put the primary air shutter/4 pieces of wood in place to block the primary air holes and add some biochar or soil on top of the hot coals inside the fuel reactor/IC.
- Allow it to cool down then the biochar can be retrieved with whatever you added on top of the fuel. 'Net negative' C emissions/'Wood gas'/'Reverse Coal' for the emergent and probably inevitable
'Industrial Revolution 4.0/'Industry 4.0'. Love that decentralisation and interoperability. And - modularity in the design sense of the word too.
First prototype of the Flat Permastove almost a success. The base plate warped so I'm using fine woven 304 ss mesh, successfully used in the Kon-Tiki 'Rolls' biochar kiln, for the base which seems to be working fine. I will probably replace it with 304 1.6mm woven steel mesh with 5mm hole aperture for longer lasting and better airflow once I get my hands on it and angle grind the base(s) from it which is cheaper than 2D laser cutting. Otherwise, after seven burns there is no obvious warping on any of the pieces. Could be an eventual winner in the flatpacking TLUD category! You can even throw a wok on it ;)
But - I need to do at least 10 burns with the new mesh and do emission testing before I can claim it's worth commercialising. In most parts of the world, it probably isn't very efficient to use high grade 304 stainless steel but in Australia we have good and affordable access to the steel plus high quality 2D laser cutters around the country. Weighing in at 5kg with a 2 litre maximum fuel volume, it's just acceptable from a logistics point of view since it's flatpacked (Volume V Weight) but could improve possibly with lighter, thinner and more heat resistant alloys eg.Nickel-Inconel but at a higher cost per gram of steel with the savings of a lighter payload but probably ends up being more expensive than 2.5mm 304 - unless of course it was shipped to another Planet eg.Mars where every gram of mass (and every additional mL of Volume) would/will cost big bucks. Cyanobacteria could be used for fuel pellets on site. In the meantime, the Half Earth Project seems to be a bloody good idea backed with scientific and cultural evidence.
Learning by doing seems to be the key to apptech.
On a different note, I recently read this article about natural gas carcinogenic benzene emissions at the stovetop:
https://www.theguardian.com/environment/2023/jun/20/gas-stoves-benzene-levels-study
Another reason not to frack! But - currently 'Catch 22' beats evidence-based policy though this may change in the future. The interface between technology and politics shouldn't be ignored and sometimes gets entangled sharing a common destiny eg.'Net negative' C emissions through adaptation V more of the same fossil fuel economy. How many tonnes of C can we remove from the atmosphere to rebalance the global C cycle?
Which leads me to my next point -
'Green energy' freedom and independence is possible with appropriate biomass technology. Natural gas is obsolete as will natural gas stove technology be obsolete when affordable 3D metal printers become accessible. Until that happens, we've got small fabrication and 2D and 3D laser cutting. The 'Chef's choice' for stovetops (and ovens) I predict will eventually be for smokeless, clean emission cooking from a sustainable energy source that's fuel efficient and boils then simmers - and that's with or without forced air control though to be fair forced air does give better temperature control on demand and is probably more fuel efficient but requires a fan eg. centrifugal and battery bank/a smartphone with a battery large enough to double as a power bank.
A good example of a forced air TLUD is the FabStove from http://www.ekasi.energy/

Seventh attempt
- vertical thin bamboo (a classic 'Permaculture plant') pieces (mesh base to secondary air hole height) with wood pellet space filler
- 1159 ignition
- 8 degsC outside temperature
- 9m to secondary air jets working
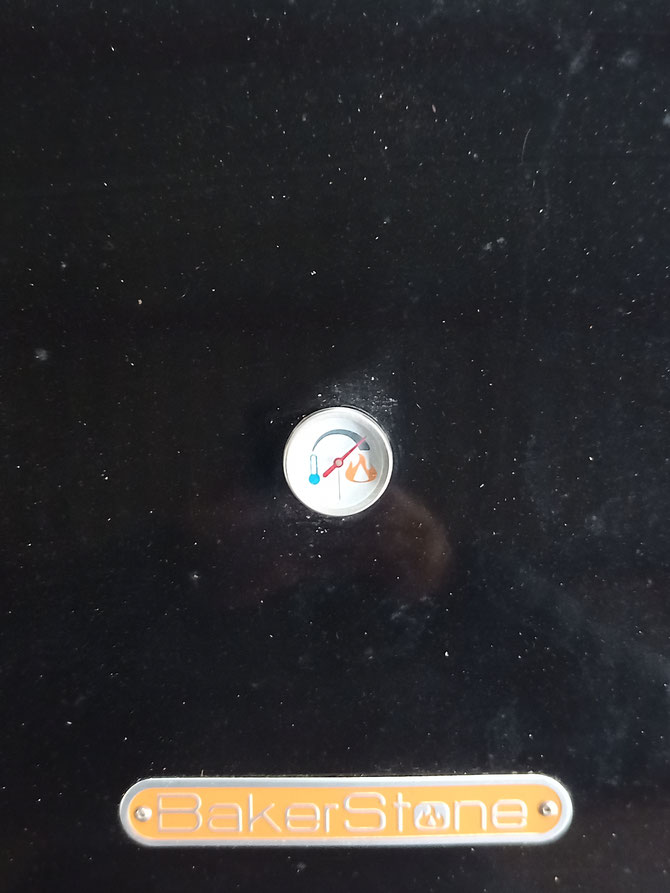
- 18m to halfway on Bakerstone temperature gauge
- 25m almost max temp
- 43m halfway again and dropping
- 1h/1300 back to zero
Still no warping of any of the stove pieces. I'm betting the surprise record was helped by an increase of Oxygen to the pyrolytic front moving upwards from the base mesh through the vertical and hollow bamboo pieces.
The Flat Permastove 'Hybrid'
If flatpacking the whole stove is not essential, I've designed a 'Hybrid' TLUD stove using the best of 2D and 3D laser cutting. The thermodynamics will be more efficient using steel tube (1.6mm 304 stainless steel) as a fuel reactor. The tube, although thinner steel (1.6mm) than the flatpacked inner chamber(IC) (2.5mm) will probably be stronger and more resistant to fire/heat with less expansion and contraction of the steel (with possible deformity of the flatpacked IC). It may turn out that the flatpacked IC, after use, pulls apart but doesn't properly fit back together again, in which case the advantage of flatpacking is lost and the tube will be the best option.
Flat Permastove and Flat Permastove 'Hybrid' side by side


Both Flat Permastove versions are highly adapted to the manufacturing resources available in Adelaide, South Australia aka the 2D and 3D laser cutting machines, available flat and tube 304 stainless steel, and turnaround time. The stoves will be optimised for wood pellets, also available, but will work with other biomass feedstock types.
DESIGN NOTES
As mentioned previously, the Top-Lit UpDraft (TLUD) tech uses pyrolysis to produce fire and biochar as a cogeneration byproduct.
A good TLUD design needs lots of airflow in the right places - hopefully I will achieve that with the Flat Permastove versions.
The outer chamber provides primary air/Oxygen to the fire via the holes at the bottom to the base of the inner chamber and at the edges (outside the inner chamber footprint) for the secondary air chamber and out via the secondary air holes/jets just below the lid on the inner chamber.
The inner chamber serves 6 functions: biomass fuel reactor/chamber, primary air at base (the 'pyrolytic front' moves down towards the primary air), secondary air in the middle (for clean combustion of 'wood gas'), chimney (above the lid for greater 'Updraft'), tertiary air holes just below the top for additional flame and cleaner combustion, and horizontal pot stand (on top).
The lid serves 3 functions: sealing the top of the secondary air chamber, centreing the inner chamber and locking the outer chamber to the inner chamber for greater structural rigidity which should greatly reduce the likelihood of pieces warping.
I should mention too that the outer chamber and crosspiece at the base are the same for both versions which is good from a scientific control perspective and is essentially a 'DSLR camera body'. The base, inner chamber and lid together are interchangeable (like a lens) with this system, an advantage of modular design - perfect for prototyping variations over time for the optimal combination. It's also scalable, but I would suggest using tube for the reactor if it gets bigger/scaled up eg. a bit larger would be perfect for a wok and a lot larger could be modded for a 'spit roast'. Lots of prototyping (and coffee) will be needed before commercialisation.
Any feedback on either of the above designs welcome! See the 'Contact' page.
Briquette maker

A simple briquette making system used to make fuel briquettes for most TLUD stoves. The stick with bottle lid is used as a piston to compress the briquette ingredients in a small PVC pipe offcut, onto a metal plate with holes for water drainage. These can then be solar dried eg. Pyramid solar oven, and pyrolysed in a TLUD stove eg.Flat Permastove.
Permachar 'Outdoor kitchen'

In the above system, biomass fuel is converted to biochar in the TLUD via pyrolysis during cooking. It then gets quenched via 'hot charging' in nutrients eg.liquid kelp, in a 20 litre stainless steel bucket and after cooling added to a trug with additional ingredients added, such as blood and bone and microbes. This can then be mixed into compost or added directly to soil in a growing system, such as the Zai pit system I've developed with the biochar core and bottom aquifer system. The biochar aquifers can be made in a Kon-Tiki biochar kiln, such as the Kon-Tiki 'Essential'.
The TLUD biochar doesn't need milling. The Zai pit central vertical biochar cores don't need milling as they need space between the pieces of biochar for conduit of water to the bottom biochar aquifer during periods of rainfall. The central cores also provide some lateral wicking and provide additional microbe housing. Milling of the bottom Zai pit biochar aquifer is needed as it works like a sponge for water adsorption and slow release wicking to the upper 'Permafert' layer during drier periods. More information on the Regenerative Agroforestry System (RAS) site pages.
The idea of kitchen waste to Terra Preta de Indio was perfected by pre-Columbian Indians in the Amazon. This integrated outdoor kitchen system uses similar principles of 'waste' management with a post-structural twist.

Permastove V4 TLUD burner


For an outdoor kitchen, I used a couple of besser blocks (which can be made C negative now: carbonaide.com) to support an old BBQ grill. The grill can be used for larger pots and pans if the pot stand on the Flat Permastove is not large or stable enough for your cookware.
PROTOTYPE NOTES
The Permastove V4 can provide a run time of 40 minutes with flame using a large 1.1kg Milo tin chimney and much longer with a small chimney (which previoiusly gave me 1 1/2 hours runtime). The small chimney on the Permastove V4 is not appropriate for the pizza oven but probably OK for soups and stews. Note that the Permastove V4 with no chimney and a pot stand is perfect for mobile use with ideally small and lightweight cookware.
With the Flat Permastove I'm hoping to stretch it to at least 1 hour of flame with the larger volume of the fuel reactor and 40mm lower height and possibly less updraft compared to the combo of the Permastove V4 with large Milo tin. This should cover most kitchen situations.
I think it's reasonable to predict that with warmer outside temperatures there will be less heat loss/dissipation from the pizza oven producing a hotter oven and probably shortening the pizza and bread cooking times.
Alternatively, a modified Carbon negative 'Steelfinder' institutional TLUD stove could do the job!
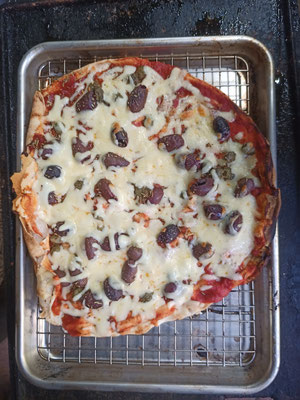
'Steelfinder 2' TLUD burner


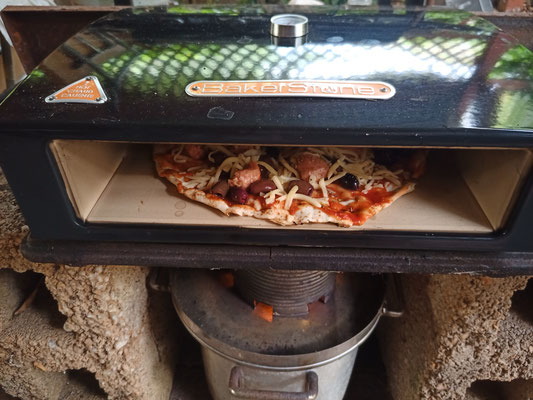

On my first test run of the modded 'Steelfinder 1' - I call it the 'Steelfinder 2', I filled the fuel reactor 3/4 full with wood pellets. It took 30mins to reach halfway on the temperature gauge, I cooked a pizza for 15mins and it was overcooked. I estimate the perfect runtime at that temperature for pizza is 10 minutes. The outside temperature was 14 degrees Celsius. The runtime for maintaining the temperature gauge at halfway was 40mins so for these conditions 4 pizzas could be cooked.
Awesome!!


My next experiment - focaccia. I used 2/3 full fuel reactor with wood pellets again. I added the focaccia to a cold oven. Outside temperature 7 degrees Celsius. The bread was cooked after 50 minutes. The oven temperature gauge was at 1/3 for 30 minutes. The main flame died after 1 hour. The bread was well cooked but the base once again was charcoal. Next time I will try using a shallow rack inside the Aluminium baking tray to take the bread off the steel and get a little convection below the bread bottom. The steel pizza paddle was effective in moving the tray around the oven, inspecting the bread and removing the tray when it was cooked. I will try cooking pizza again, using the new rack system to get it off the ceramic and provide a little convection beneath the base.
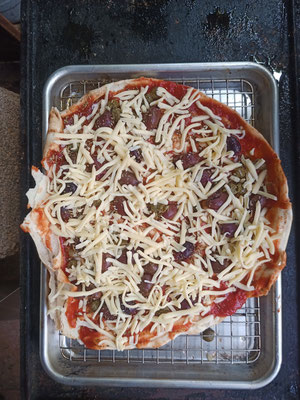

Second attempt at pizza - success!
Half full fuel reactor using wood pellets
Outside temperature: 9 degrees Celsius
Using the nested rack in the Aluminium bread tray
1130 Ignition
1150 Pizza in (Temperature gauge halfway)
1200 Pizza cooked and out
1213 Flame out
1225 Temperature gauge below halfway
Total burner runtime: 35 minutes, enough time for 3 pizzas
Although the pizza was slightly undercooked, the pizza base did not form charcoal at the bottom which means the rack system was a success too! Next step - optimise the pizza oven for focaccia...
Second attempt at focaccia...almost success
The bread was perfectly cooked. I've now worked out with the rack system that my bread rises too high so I'm going to halve the yeast to 1 teaspoon for 1 batch. The runtime once again exceeded the bread cooking time so I'm going to try a 1/3 full fuel reactor next time. There was also virtually no charcoal at the base - yay.
I should mention that every fuel source is different and needs to be optimised to the stove or kiln technology.
The Earth Survival System (ESS)


- The Permastove V4 had a 1 hour and 40 minutes simmering runtime with a fuel chamber filled with wood pellets to 20mm below the secondary air holes. Biochar pellet recovery was achieved.
- The Flat Permastove V2, with wood pellets filled to 30mm below the secondary air holes in the fuel chamber, boiled 10L of water in an hour. Biochar pellet recovery was achieved.
- The 5L ss bucket after water was boiled (X2) was then tipped into the 20L ss bucket using welders gloves (WHS), grasping the handle with my left hand and holding the bucket lip with my right hand, slowly rotating it upwards while emptying it until empty.
In a mostly developed country like Australia, this system could seem ridiculous but still has a place for backup household cooking and WASH if there's ever a problem with an electrified system or gas shortages (as unbelievable as it sounds - we export most of it and even import some of it).
It could also be a primary system in Australia where grid access is unavailable or for many parts of the world, including climate refugee camps that will only increase in number as fossil keeps burning eg.one billion climate refugees, for every one degree Celsius increase of the average global climate temperature. We will presumably need a completely different approach to fossil policy ASAP and climate refugee policy in the future which is basically now eg.Kirabati.
We are very lucky in Australia where many Aussies enjoy an outdoor lifestyle. The Permastove V4 is a '3 systems in 1' technology. Car camping, 4WD adventuring and trekking base camps are all possible applications. It can also be a useful multi-day trekking biomass stove suitable for many ecosystems in Australia (or anywhere) where there is biomass available - just add the 2L ss billy.
I believe the ESS kernel, central to the ESS is a viable and sustainable adaptation alternative to electricity and 'unnatural gas' (if it was natural, the methane would be left in the aquifers) to create the smallest C footprint possible - in fact, it's probably C negative over the long term taking into account the C emitted during manufacturing of it's components, supply chain logistics C emissions and C removal via biomass to biochar over it's service life.
It's also completely modular, where the ESS kernel and ESS itself can be adapted/modded to local conditions which could depend on manufacturing capability (materials, machinery, tools, skillsets), market access, affordability etc. - whatever is appropriate!


'Steelfinder 3' TLUD burner
Materials:
The 'Tinkerer TLUD'
I call it the 'Tinkerer TLUD' - a great model for small scale biochar experimentation at little cost.
Materials:
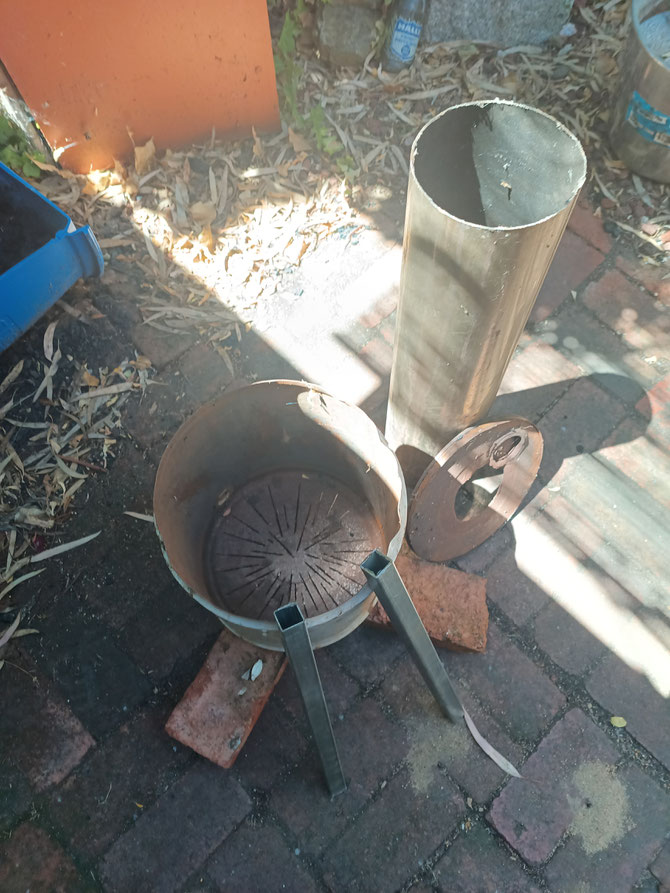
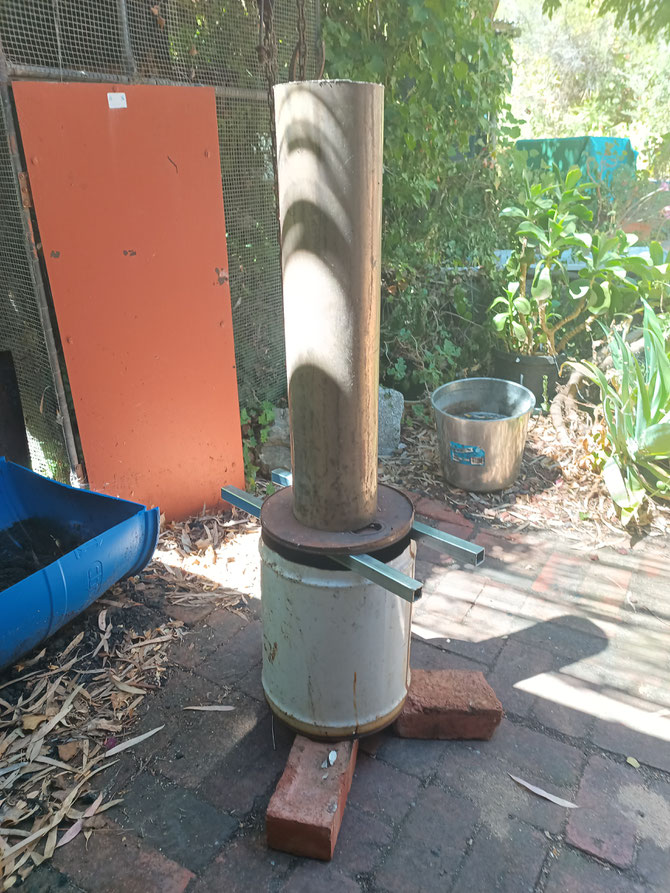
- 20 litre oil drum (mild steel)
- 1m x 25mm square tube (galvanised steel)
- 1m of standard stainless 6" chimney flue
- 3 bricks
Construction:
- grind the top (lid) off the oil drum
- grind a 5" hole in the centre of the lid
- grind radial slots in the bottom of the oil drum
- grind 2 x 50cm of square tube that will sit across the top of the oil drum (for secondary air and supports of the lid and chimney)
- grind an approximately 65cm length/section off the chimney flue piece
- use 3 bricks for base support of the TLUD (and for primary air at the bottom of the oil drum)
The TLUD mainframe for this beauty is a little different to the Permastove Burner, Steelfinder V3 and Flat Permastove. The mainframe has been proven to work in 200L oil drum TLUDs used all around the world. The mainframe still operates on the updraft principle where the pyrolysis fire front inside the oil drum moves downwards towards the primary air/Oxygen at the bottom of the oil drum. The secondary air/Oxygen between the top of the oil drum and lid ensures a clean secondary combustion of the wood gas with the updraft of the flame, tiny amounts of emissions (if the moisture content of the feedstock is less than 15%) and air through the chimney and out the top. There could be some cogeneration for this design eg.boiling a billy on a pot stand with a milo tin, at the early stage of a burn before adding the chimney for the main pyrolysis burn. For cooking/boiling water cogeneration the smaller fuel reactor volume of the stoves mentioned above eg.2L are more appropriate but have the disadvantage of smaller batch yields of biochar - unless of course the TLUD stoves are used regularly, then the biochar produced will start to add up fairly quickly.
This design could be the sweet spot for cost, access to materials, 1 tool (angle grinder), ease of construction and larger sized batches compared to stoves for various growing systems.
This design could be used for small high temperature->high surface area->activated batches of biochar used in air filtration, water filtration and hydrogel for Atmospheric Water Harvesting (AWH).
Alternatively, the biochar (finely milled) could be used for seed raising mix, microgreen trays and potting mix for say vegetables, herbs and small trees using recycled PET/PETE based polyester fabric bags that could be wicked.
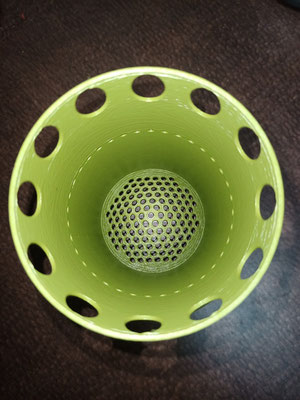
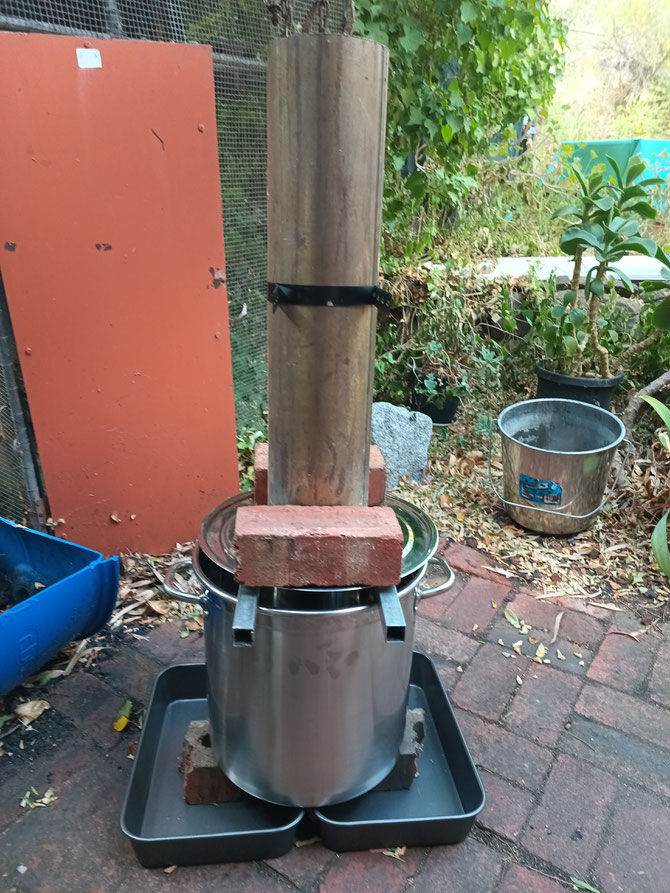
Stockpot TLUD Biochar System (STBS)
A 50L stockpot could be turned into a TLUD with some grinding, for a prefilled batch run of biomass to biochar. This is the same mainframe used for the 20L 'Tinkerer TLUD' (above) and 200L oil drum TLUDs but for an in between sized 50L batch of biochar. I imagine this will be good entry level system for testing different feedstocks and running small biochar experiments. The volume of biochar produced/feedstock availability/feedstock processing effort required is probably suitable for an urban setting. This apptech should be perfect for smaller biochar integrated systems such as water filtration, microgreens and fabric pot growing systems.
Components
- 50L stainless stockpot
- 1 metre of 1" galvanised square tube (or 304)
- 2x Carbon steel oven trays 39cm x 28cm x 7cm
- 1m x 6" 304 stainless chimney flue
- 6" chimney wall bracket
- 3 standard bricks
Tools
- angle grinder with discs suitable for stainless
Fabrication
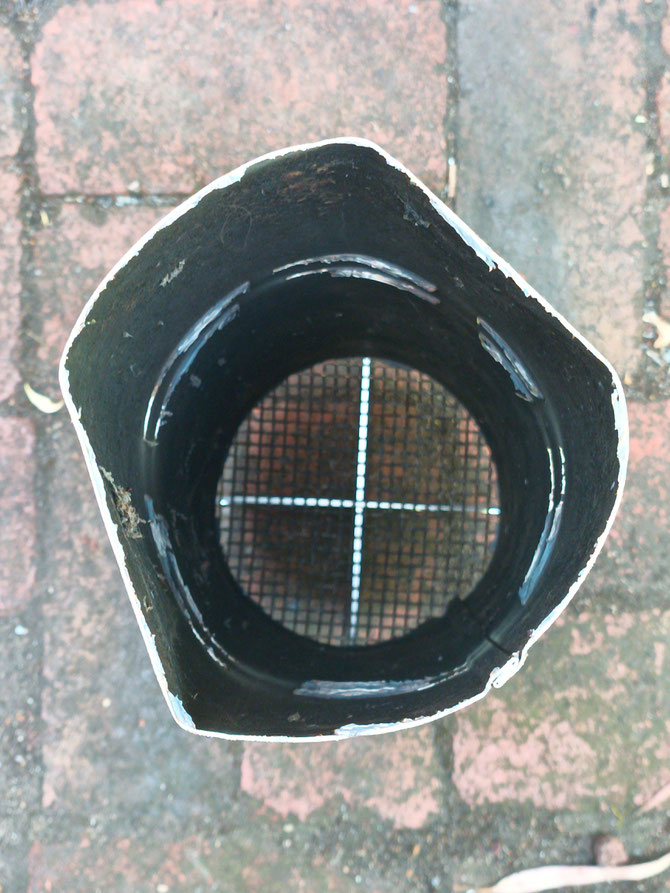
- grind lots of small slots in concentric circles in the base of the stockpot
- grind a circle slightly small than a 6" diameter circle in the centre of the stockpot lid
- grind the square tube in half
- grind 2/3 off a 1m chimney flue
- assemble all parts according to the photo
Features
A couple of bricks are placed at the base of the chimney providing a stable platform for windproofing and stabilising it while also locking the lid on.
The advantage of the large C steel oven trays at the base are:
- Insulates the base of the Stockpot for a hotter fire = more fuel efficient and higher surface area of the biochar
- Allows more primary airflow than a 3 brick system
- Can provide a stable platform for the TLUD - handy if only uneven ground is available
- Collects excess water from a burn quench for reuse in the next quench
- A safer system than tipping the biochar out of the stockpot into a water filled bucket/stockpot quenching system
The STBS could also be used as a firepit.
Overall system cost: AUD$230
- Place a couple of large oven trays eg. C steel with 7cm depth (same depth as a standard clay brick), edge to edge in the centre, on the ground with a half brick in the centre of each tray
- Place the stockpot in the centre of the tray footprint
- Add the fuel to stockpot all the way to the top eg.wood pellets, rice husk pellets, nut shells eg.macadamia (perfect), almond; thin bamboo pieces, small sticks, ?kangaroo droppings, ?elephant dung, ?yak dung etc. or a combination of biomass/feedstock to get that little bit of airflow happening between the pieces for access to primary air flow
- Squirt some firelighter gel on top in a couple of concentric circles
- Light a scewer at one end or use a butane flame torch to light the gel
- Add the 2 square tube pieces
- Add the lid
- Add the chimney
- Secure the chimney with a couple of bricks
- Burn
- End of burn
-An infrared laser thermometer/infrared camera (standalone/smartphone) could be used with the STBS to work out the outside temperatures of the stockpot to predict when a burn is over but would need to be calibrated to the feedstock. Another method is when the flame stops exiting the chimney, the burn is over but a little innacurate. Whatever works best for you - maybe you can work out a better way to do it - just don't burn yourself.
Put on the welder's gloves. For a quench/water-free method, the chimney can be removed with a steel '6" flue wall bracket' attached to the chimney half way down (used like a handle), the lid bricks removed, the lid removed (on the edges), the 2 square tubes removed (at the ends), then place a few inches thick layer of premade biochar (preferably finely milled) on top of the top coals, lift the stockpot with the handles and place it on flat ground next to the oven trays - this will essentially starve the remaining biochar coals of Oxygen and avoid turning it to ash. There is a small risk of touching the outside of the stockpot while moving it and getting a nasty burn on your legs - wearing thick cotton pants would be advisable.
-Alternatively, for a water-based quench after a burn, with welders gloves again, remove the chimney, remove the lid bricks, remove the lid, remove the square tubes then pour bucket(s) of water over the biochar and completely put out the hot biochar coals. There will be some steam - avoid it. Excess water will exit the base of the stockpot and collect in the oven trays for reuse. If the stockpot is reasonable quality, the metal shouldn't deform with the hot-cold shock of the cold water touching the hot stainless steel.
-The quenched biochar could be added to an incubator, such as half a PE barrel or even a 100L stainless stockpot which are easy to clean, good if you are doing microbial inoculation as you can clean the stockpot between each batch..


The STBS could be integrated along a cascade of uses that I call 'Carbon Removal for a Cascade of Uses' (CRCU).
For eg., the biochar from the STBS could be added to a gravity fed biochar filtration system (the 2 buckets with mesh, back and centre). The spent biochar in the filter needs replacement every so often, so this 'waste' can be added to a piss/urine bucket (front centre) for Nitrogen charging and odor control. The used urine can irrigate growing systems eg. a fig tree (front right). Alternatively, biochar can be added from the STBS directly into a 100L stainless stockpot (back right) for more complex inoculation/charging eg.Biochar (with the option of pH adjustment) + liquid sea kelp + microbes + fungal spores + rock dust. The 100L can also be easily cleaned in between brews. This witches brew can then be added to compost eg.aged poultry manure and straw, then mixed together. The mix can then be added to pots eg.fabric (made from recycled PET/PETE and BPA free), combined with soil (which bulks it out and adds some local microbiology - I call it 'Permafert') then added directly into a Regenerative Agroforestry System (RAS) eg. V swales and Zai pits.
The 'Permastove Kitchen' (PK) could also be built and used (see web page above) for smaller amounts of biochar produced while boiling or cooking, which could be on a daily basis - the small biochar volumes from each burn will quickly add up over time. If there is surplus biomass eg.on a small land holding, a Kon-Tiki 'Essential' biochar kiln could be used for larger batches (which I am also selling - see web page above if you're interested).
I am also R&Ding a larger integrated permaculture/biochar system I call the 'Earth Survival System' (on the 'Overview of Permachar Systems' page).
Chimney TLUD burner


- 3 off a 1 metre length 6" diameter 304 stainless chimney flue.(thickness varies but go for the thickest you can get) for a combined fuel reactor and chimney
- Easier to grind than 1.6mm thick304 stainless exhaust tube (and cheaper)
- Primary air/base uses the same 2D laser cut cross piece and grinded 304 1.6mm 5mm aperture woven mesh as the 'Flat Permastove'
- Secondary air via two rows of grinded slots
- Carbon steel oven tray (7cm deep) for collecting and quenching the biochar after a burn
- Mixed thin bamboo and wood pellet feedstock for the Bakerstone pizza oven or Universal Pot Stand (UPS) from the 'Permastove Kitchen' (see page above).
- Perfect for a Bakerstone pizza oven
After a burn, with welders gloves, lift the chimney piece and the biochar will fall out the bottom into a small pile in the flat-based oven tray. Add quench water.
Scoop up and add to your preferred inoculation device eg. A 100L stainless stockpot.
And just for fun - not a TLUD - the 'Simple' stove

What about that NORI?
NORI's lightning sale has just been joined by the Schwarzenegger Institute, offsetting the footprint of their operations. So what I am thinking is if I can work out the supply chains for the Permastove V5, I could embed the purchase of NORI CRCs into the cost of buying the stove in order to offset Carbon emissions of manufacturing/production. Then, if a village or co-op down the track wanted to buy stoves (or even produce their own stove on the coop level with 2D and/or 3D laser cutter purchases via public/private philanthropy), biochar produced could be reimbursed with CRC purchases providing NORI tokens proportional to how much biochar they produce.
Production of biochar-making apptech and uses of biochar
Biochar kiln and stove production logistics
The 'Permastove' is more complicated to build compared with the 'Carbon' V3 (See the Flat-Tiki 'Carbon' page). There are more parts and more things need to be done to the metal. I've been told that the double fold on the 'Carbon' V3 is tricky but doable for a skilled press brake operator. The 'Permastove' V2, V3, V4 however requires rolling, bending (with the exception of V4) and welding in addition to 2D laser cutting (which is a skill in itself). The 'Permastove' V5 requires 3d tube laser cutting and 2d flatbed laser cutting. I'm thinking that 500W fiber optic 2D laser cutters and 3d tube laser cutters could be purchased in a given region (maybe with Nori tokens) and located at a centralised workshop for both the kilns and stoves. The 'Permastove' V2, V3, V4 could be distributed as a flatpacked kit to local workshops that can do rolling, bending (with the exception of V4) and welding. The 'Permastove' V5 doesn't need any additional fabrication after laser cutting so should be made at a centralised workshop. These workshops could then act as stove and fuel distrubution hubs. For stoves, I prefer this model over a centralised workshop that does everything but only creates distant jobs through the biochar related supply chains but in some cases centralisation may be the only option (eg. 'Permastove' V5). It makes more sense to do the cutting and folding of the 'Carbon' V3 at a centralised workshop then distribute it from there. For both stoves and kilns it depends on local preferences too eg. What's the most appropriate way of doing business? Where is the unemployment? What transportation links are available? Most importantly, where is the market?