Flame Cap 'Corrugated Box' Panel Kiln


The idea is to use this kiln for bamboo or any long feestock eg. forestry waste. As with the 'Algorithm', the kiln can be extended/expanded to however long you need it to be with additional corrugated sheet side and base panels (option 1) and star pickets. The overlap of the side panels compared to the end panels may not be a problem as they could provide some protection for the Charista and heat and wind protection for the fire.
This can be water quenched (without water recycling) or soil quenched.
Flame Cap 'Corrugated Box' V2 Panel Kiln


I haven't got around to raising 'pre-seed' funding for the Flame Cap 'Algorithm' V3 Panel Kiln R&D cluster.
Here's the next best thing which cost me no additional money to build. Just need to wear a respirator (safety not guaranteed) since the corrugated sheets are Zn Alume. It's a well vented area which should reduce the fumes. Even better would be some iron corrugated sheets without galvanisation, if you can get it, generally sourced from old demolished fences in Oz.
A key point to consider
- higher level of feedstock processing (more time and effort) with a better 'flame cap' and higher biochar yield for eg. a Kon-Tiki cone such as the Kon-Tiki 'Essential' (KTE), Kon-Tiki 'Rolls' (KTR) etc. V low level of feedstock processing (less time and effort) with lower biochar yield for eg. a Flame Cap Panel Kiln such as this 'Corrugated Box' prototyped for the 'Algorithm' V3
Tech specs
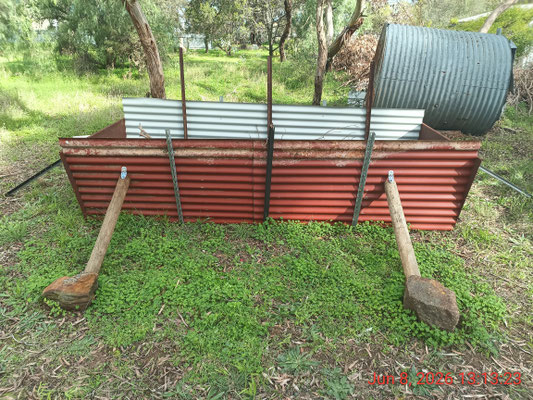
- 2,573 litre volume (with expansion/extension possible for higher volumes)
- One 3.2m corrugated roofing sheet (305) for back side panel (vertical), two 1.7m corrugated roofing sheets, overlapping 100mm in centre, for the front side panels (sloped, for easier feedstock entry with very stable impermanent bracing). The 2 types of bracing will be compared
- 2 'Oregon hybrid' V1 kiln sides for ends (mild steel with top fold, facing outwards, vertical)
- 3 long star pickets and wire for fastening back side panel
- 6 short star pickets, 3 per each end panel (one central, inside kiln + 2 near edge, outside kiln) plus 1 star picket external brace per end panel
- 1 star picket for front side panels at sheet overlap point (centre)
- 2 wooden pole sections and 2 SS hinges (3 screw holes per section), 6 short metal screws (3 per hinge, screwed into front panel), 2 long metal screws (1 per hinge, screwed into pole section allowing some movement at end), for impermanent front side panel bracing ~1 foot from each edge, with large panel contact area
- 2 rocks for wooden pole bracing support at far end
- Galvanised slotted angle (90cm, Bunnings) for panel reinforcement (1 per front panel, 2 on back panel). Hopefully don't need more of it!
- steel sheet bottom (optional - if clayey top soil will bake and harden, no need for a sheet. Could possibly dig down to the clay for a baked/hard surface and increased volume, though not really needed)
- no heat shield (common now throughout the 'Kon-Tiki' kiln world)
Feedstock
-
long bamboo culms eg.3m sections and/or bamboo processing 'waste'
- forestry/agroforestry waste
-
straw eg. rice, wheat, maize, lentil, sorghum, mung bean, millet, hemp etc.
- vine wood (hardwood->if 'old', slow burning and less intense heat)
- and more...
Operating software: Flame Cap!
- need to operate on a very still day (Winter) with minimal wind to be safe
- WHS: welders gloves, steel capped boots, cotton/hemp clothes. Optional respirator for first burn
First step for the first burn
- Use leafy feedstock waste residue eg.forestry/agroforestry if available, utilising the oil in the leaves for a very hot fire which should burn off the VOCs...probably best to wear a respirator for the first burn and stay at least a few metres away from the kiln between adding feedstock while the VOCs burn off
Lighting the burn
- remove one front panel, build a feedstock stack 1/4 of the height of the kiln, add tinder with firelighter gel in small piles along the top and length of the large stack then light at the top
During the burn
- Wait until the stack has burnt down and formed a layer of hot coals in the bottom
- Add the first and thin eg.2” layer of feedstock covering the entire top surface of the hot coals. There may be some smoke at this stage. This is a combination of water vapour being released (white smoke) and regular smoke produced from the layer starting to pyrolyse/burn at the bottom of the feedstock layer
- When the top of the layer begins to ash, it is time to add the next layer. The layer should completely cover the bottom layer. Once again, the layer should only be thick enough eg. 3” to cover the under layer surface and still allow limited air to move through the upper/new layer. This is an art that needs to be perfected for every different feedstock type, size of processed feedstock and feedstock moisture content. If forestry waste is being used as feedstock, note that smaller feedstock pieces need to be used in the lower half of the kiln and larger pieces in the upper half of the kiln
- Once again, wait until the top layer is starting to ash under the ‘flame cap’ then add the next layer and repeat adding layers until the cone is filled with biochar right up to the top of the kiln
- Add some small pieces of feedstock to the top layer to finish the burn. Once the flames have almost died down it’s time to quench! If you leave it any longer, the biochar will start to break down beneath the flame cap, ash and reduce the biochar yield.
After a burn
- top water quench using hose plus use poker eg.star picket, to expose the bottom Biochar. Mind the steam
- For smaller biochar volumes, quench until almost zero steam and smoke
- For larger biochar volumes where steam and smoke can not be completely stopped 'in kiln':
- Remove the front side panels
- remove the C clamps used in the panel overlap reinforcement
- remove the bracing rocks
- drag each front side panel, using the poles as levers, to the front and side of the kiln leaving enough area for biochar removal (see next step)
- rake out Biochar using the landscaping rake
- additional quenching with hose as needed (with possible pH adjustment and inoculation or combined/mixed with manure)
TESTING
First burn
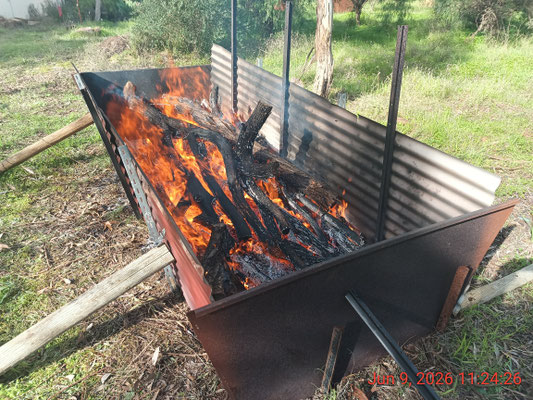
- Built a hot fire (up to 784degsC measured with a laser thermometer near the end of the burn) and possibly all VOCs released.
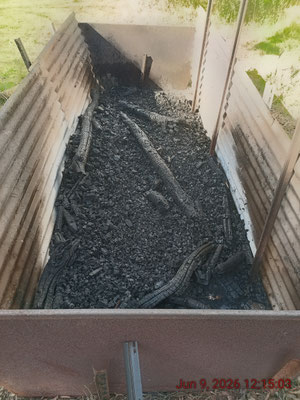
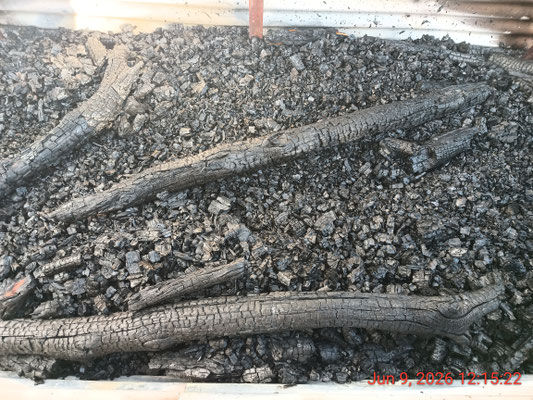
- Layering was not perfect and the entire volume of the kiln was not used
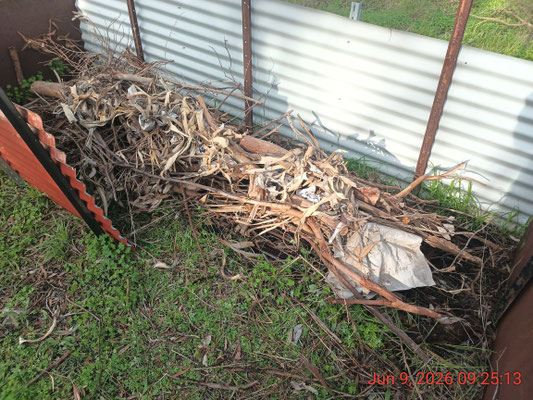
- The forestry waste had minimal prior feedstock processing (cut into limb and branch lengths ~2m long but could be cut to 3m long which would be optimised for this kiln and still ergonomic enough to move around) and loaded into the kiln like a dream. Compared to all the feedstock processing I undertook for the KTE and KTR, I wish I had built this kiln years ago!
- The fire was perfectly wind protected on a still day but a high level of caution was used, allowing plenty of distance between the kiln and me in between adding feedstock to minimise the chance of burning my face
- Feedstock was not bone dry (presumably some above 15% moisture content (MC) but plenty of oily leaf used intermittently throughout the burn which dried and pyrolysed the feedstock during the burn with almost zero smoke
- In kiln quench worked well with biochar mixed during the quench until zero steam and smoke
- Pretty decent volume of biochar produced for the first burn!